Manually add devices to Apple School Manager
Preface: Reasons for adding to the DEP
In order to use the full functionality of the remote maintenance of mobile Apple devices, it is strongly recommended to add the devices to the so-called Device Enrollment Program (DEP) of Apple. This will automatically register the devices with the Apple School Manager at the University of Cologne. If you are planning to purchase new devices, you have the possibility to order them directly from the reseller for a fee. Especially for large orders this is highly recommended. If you already have devices in your inventory, if new devices are added individually or if devices have been donated, for example, you can also add the devices manually to the Apple School Manager. However, this only applies to iPads and Apple Tvs; Macs cannot be manually re-registered using Apple Configurator.
If you plan to use a / our Mobile Device Management (MDM) Jamf School to manage the devices, you don't necessarily need to add the devices to Apple School Manager or DEP, but it is strongly recommended as only automatic device enrollment (formerly Device Enrollment Program, DEP) prevents users from removing the MDM profile from the devices. Other restrictions and device configurations can also only be configured on supervised devices. For more info on this, please also refer to the Jamf doc on device enrollment. Nevertheless, "non-supervised / supervised" devices can also be extensively supervised in Jamf School.
These profiles are installed on every device that is managed by an MDM. Only by means of these MDM profiles remote control works correctly. The possibility to delete these profiles on the user side is therefore counterproductive.
If the devices are added to the DEP of the Apple School Manager of the University of Cologne, this is prevented.
The DEP is also the registration method recommended by Apple. Only through automatic device enrollment can you fully utilize all the device management features available in Jamf School (or indeed other MDMs). For iPads, for example, this concerns the single app mode or other restriction options that are of interest to many users. Furthermore, the devices are clearly marked as property of the university and individual institutes / projects and can be locked and located in case of loss or theft.
Note: For manually added devices to the Apple School Manager there is a transition period of 30 days. Within this period, you can unlock the device again and remove it from School Manager without any problems. Otherwise, it remains permanently in School Manager.
2 Möglichkeiten die Geräte manuell zum DEP hinzuzufügen:
--> Dies ist eine recht neue und einfache Methode die Apple selbst beschreibt. Ab dem Punkt: "iPhone oder iPad hinzufügen" ist das Vorgehen beschrieben. Auch Mac lassen sich damit nachträglich hinzufügen.
Wir empfehlen die erste Vorgehensweise!!
- Am Mac mittels dem Tool "Apple Configurator 2". Diese veraltetet Methode funktioniert immer noch, ist aber etwas fehleranfällig. Fürs Anwenden der zweite Methode folgen Sie der weiterführenden Anleitung.
To add the devices manually, proceed as follows:
Install Apple Configurator 2
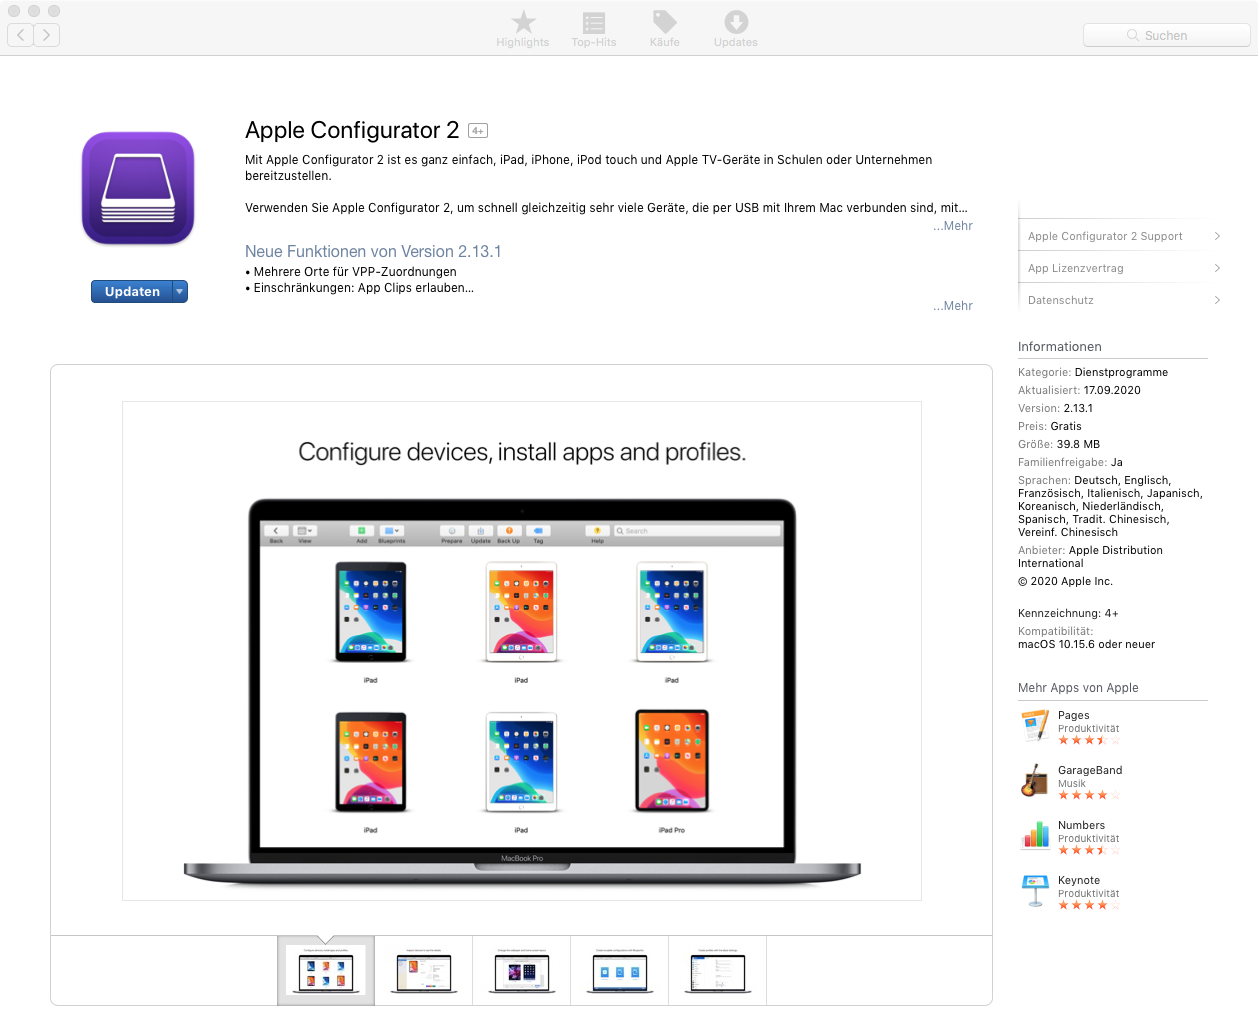
To add the devices manually to the Apple School Manager, you need a Mac.
Download the free "Apple Configurator 2" from the App Store.
Connect iPad
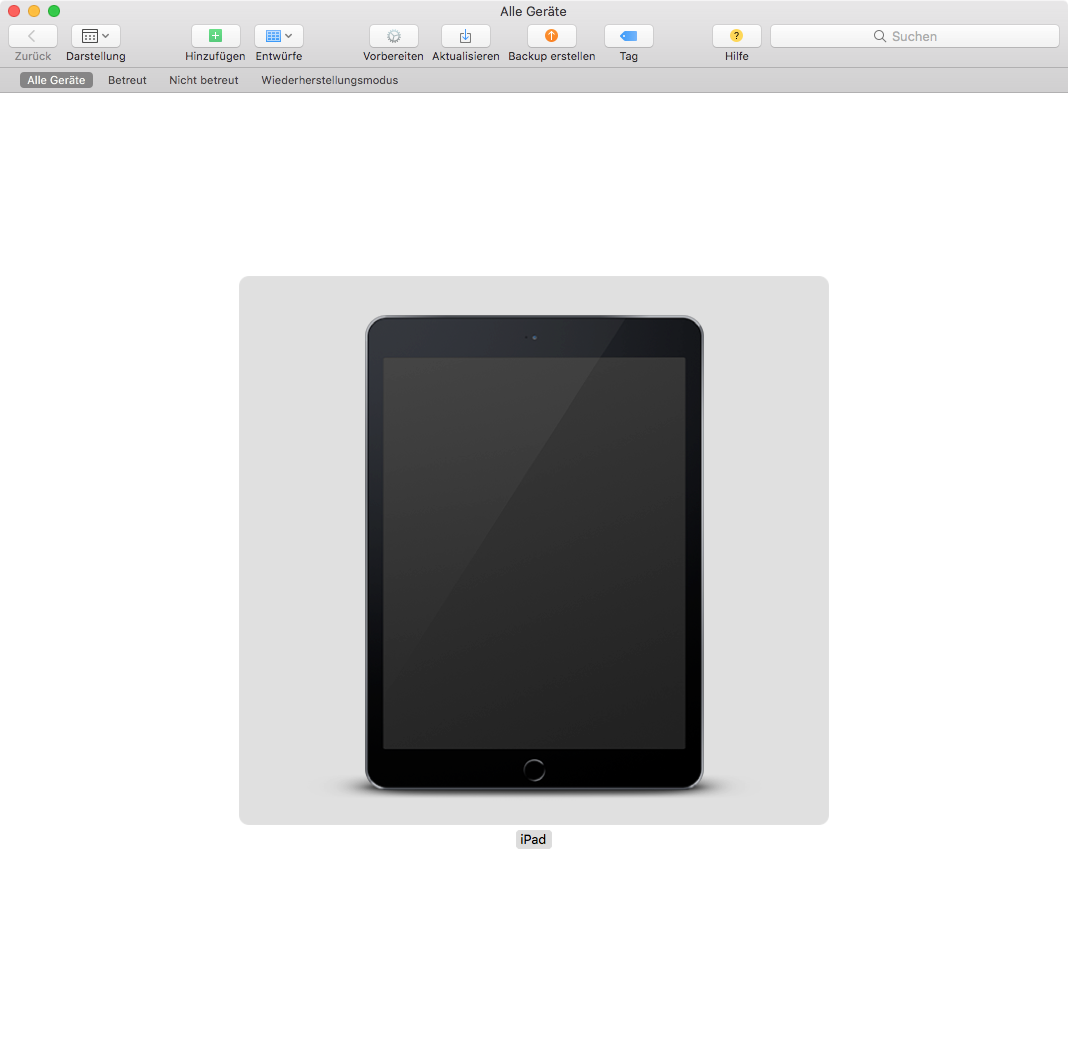
Connect your iPad to your Mac via cable and open the Apple Configurator 2.
Click on the iPad and then on the small gear icon "Prepare".
Note: If you want to manually add multiple devices to School Manager and MDM, you can create a blueprint and apply it to all iPads later.
The procedure is not much different from the single application described here. You select the iPad, create a new draft / blueprint and assign a name, e.g. Blueprint ASM and Jamf. Then you click on the "Prepare" gear and go through the following steps one by one as described in this guide. Later you can apply the Blueprint to your devices.
Prepare devices

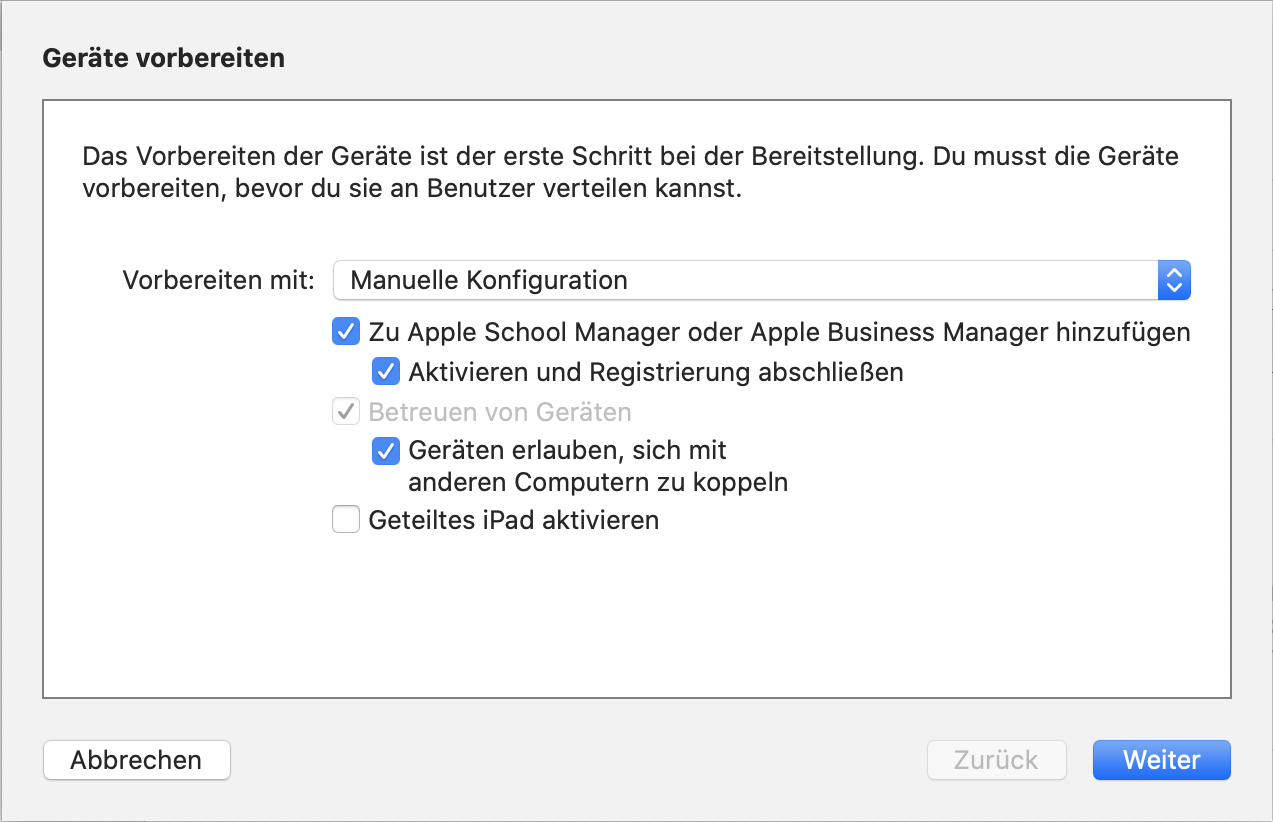
Select the following items:
In the drop-down menu: manual configuration
- Add to device registration program or Add to Apple School Manager - depending on which version of Apple Configurator you are using.
- Activate and complete registration
- Manage devices (automatically selected)
- (optional) Allow pairing with other computers. This can be useful if you work with several employees on sub. Macs with the Configurator (e.g. also in the office and home office)
- (optional) activate shared iPad - if you plan to create different users on one iPad
Read MDM server address and have it ready
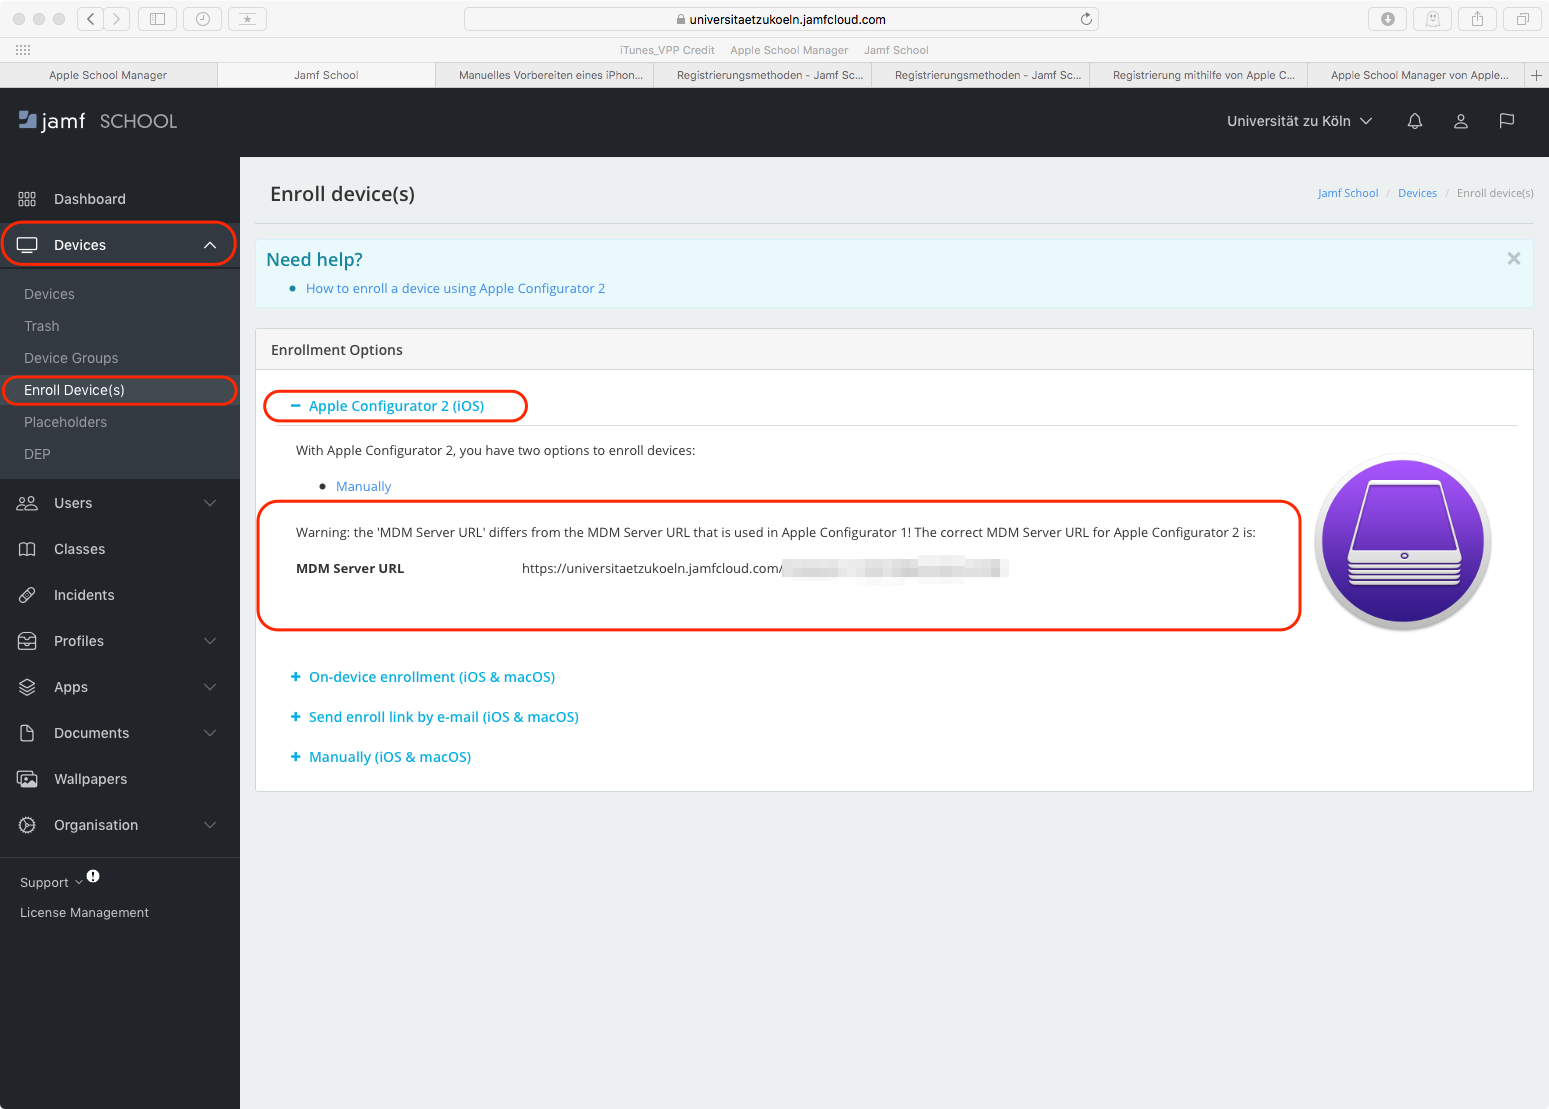
- Log into the web interface of the MDM Jamf School.
- Under Devices - Enroll Devices - Apple Configurator 2 - copy the MDM Server URL
Add MDM Server to the Configurator
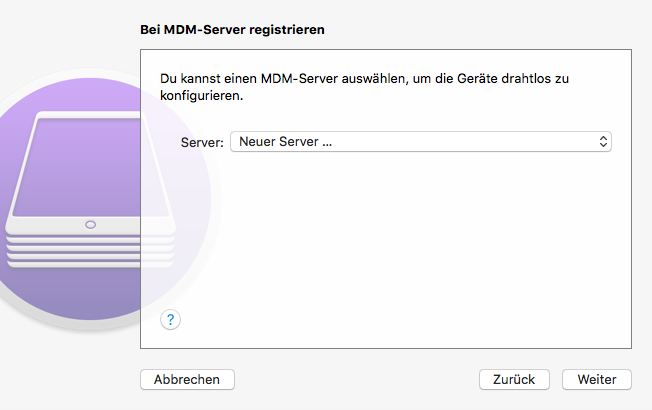
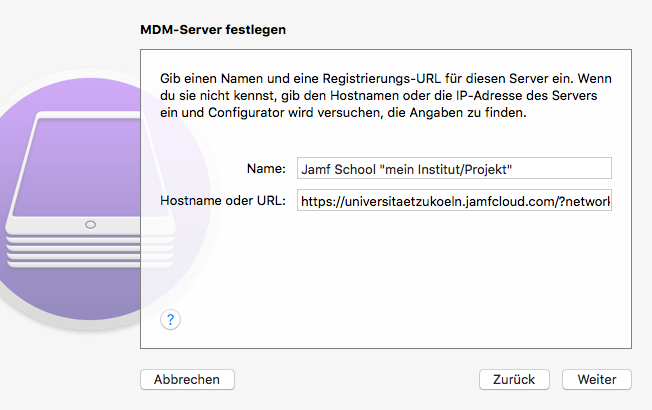

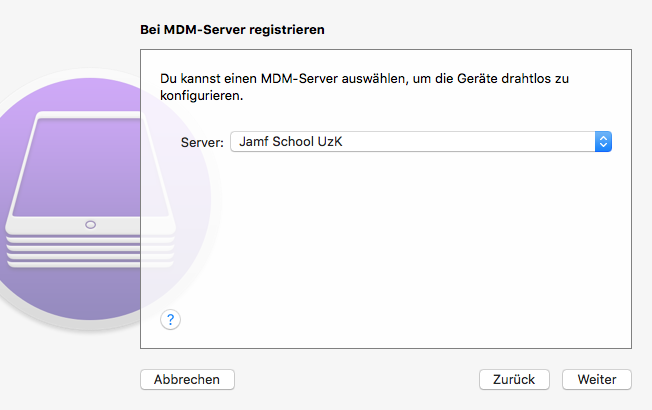
- Back in the Configuratior, select New Server from the drop-down menu and click Next.
- Assign an individual name, e.g. Jamf School UzK. Then paste the server URL you just copied from Jamf.
- If the connection is successful, the server certificate *jamfcloud.com will be displayed. Select it and click Next.
- Once created, the server can be selected from the dropdown menu in the future.
Add organization
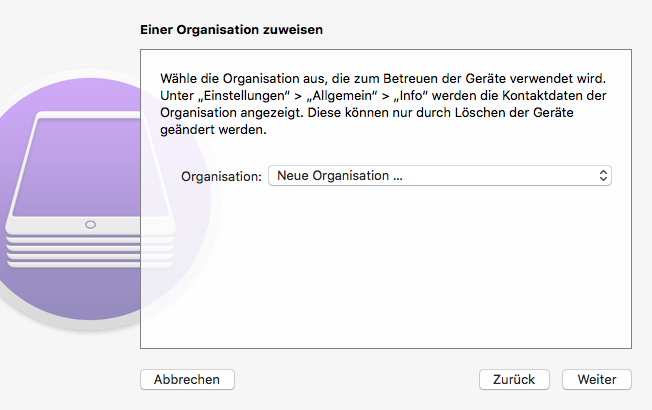
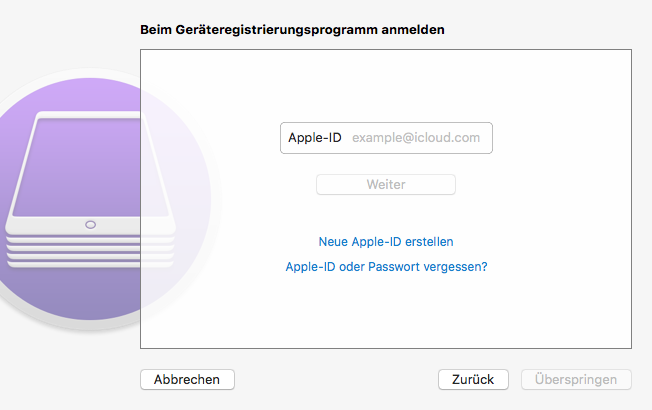
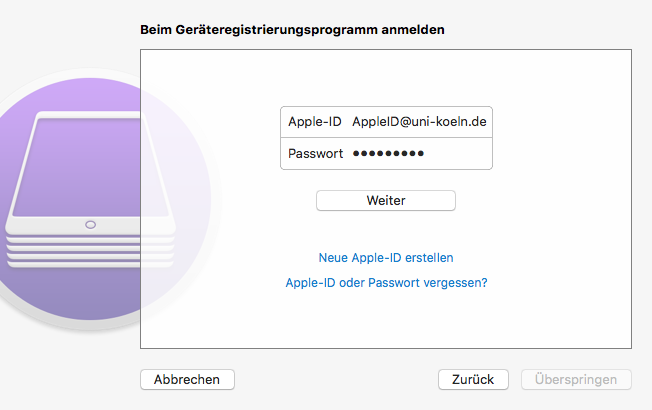

- Create a new organization.
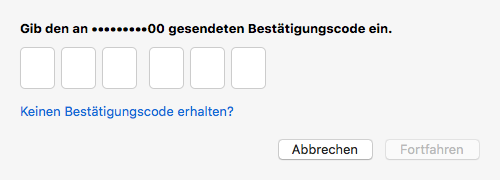
- Log in with your managed Apple ID. I.e. with the Apple ID that we have created for you in the Apple School Manager. The authorization of a so-called device manager is necessary. If you don't have the authorization, adding to the School Manager will fail.
- Then follows the 2-factor authentication via SMS to the cell phone number you specified in the Apple School Manager.
- In the future you will be able to select this organization directly in the dropdown menu of the Configurator.
Create new care identity or select existing one
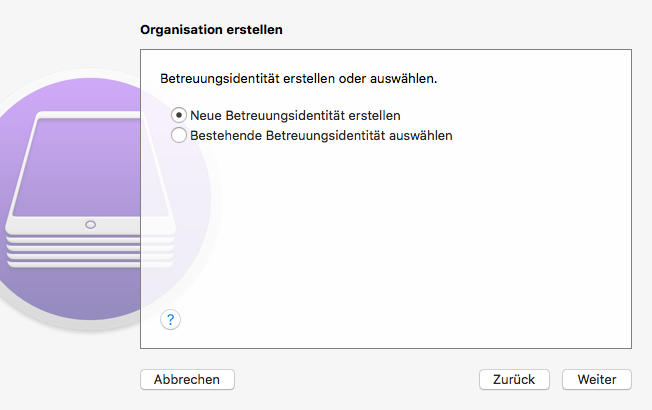
- If you have newly created the organization, select Create new caregiver identity.
- If you have already created an organization in the past, you can select it here.
Configure iOS Configuration Wizard
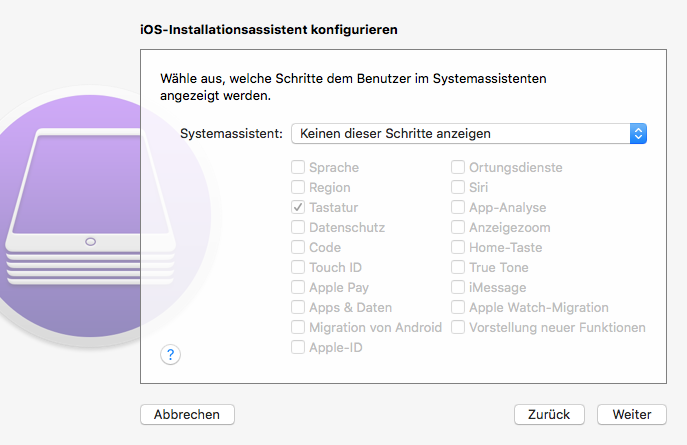
- Here you can define which steps are run through in the initial configuration of the iPad. The steps are all optional.
- So you can select e.g. Show no steps .
Select network profile
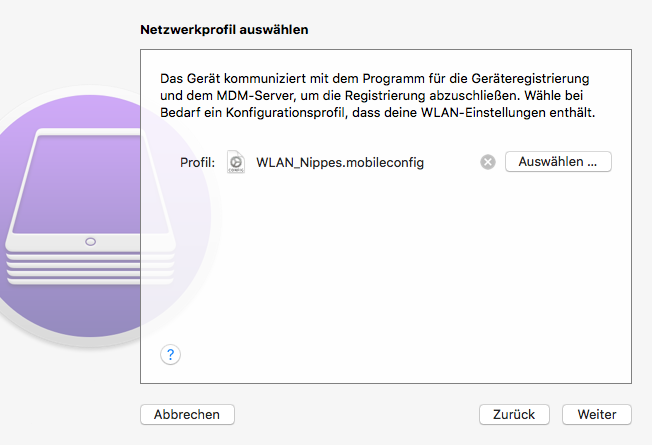
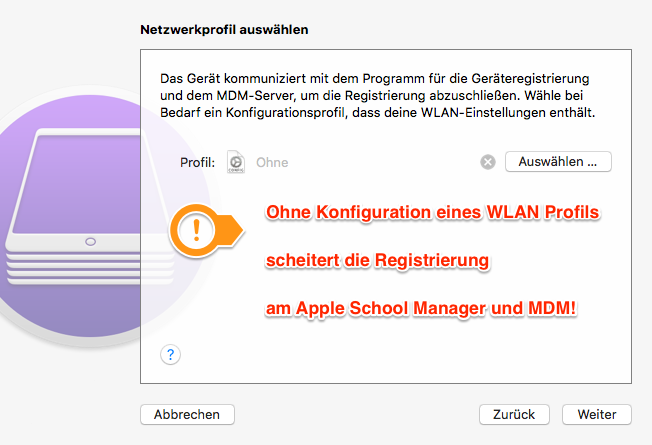
- Attention! For the initial configuration, a WLAN profile must be added here! Without initial WLAN connection, the devices cannot be registered at the School Manger and in Jamf.
- Since the eduroam profiles are not suitable for this, it is recommended to do this in the home network / home office or other network. This is a one-time matter for the initial manual configuration. After that, the devices can be managed in eduroam without any problems.
- You can find instructions for creating a simple WLAN profile here.
Enter account MDM Server
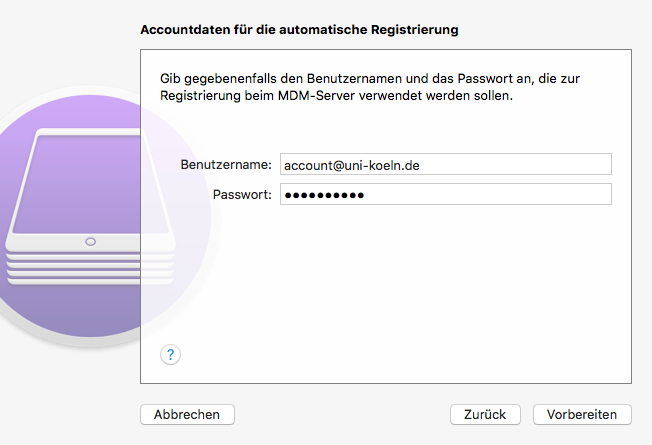
- Then enter your Jamf School account that we have created for you.
- The email address is usually the same as the email address of the managed Apple ID we created for you.
- You have set your own password, which may be different from the password for the Apple School Manager.
Delete iPad if necessary

- If the iPad has already been in use or similar, Apple Configurator 2 may ask you to delete the iPad and reset it.
- Confirm this. Please keep in mind that all data, apps and settings on the iPad will be deleted.
- If necessary, make a backup of the iPad first. This can also be done in the Configurator, Finder or iTunes.
Note: error handling
If you receive the following error in Apple Configurator 2 during the registration process,
MCCloudConfigErrorDomain - 0x80EF (33007)
the registration has failed. This can be easily worked around by having the iPad already have WLAN at the beginning of the registration process.
This means: there must be an active internet connection initially, in addition to the WLAN profile which is passed during the registration.
Repeat the registration process with active internet access. After that the error message should disappear.
Note Error message at the end of registration
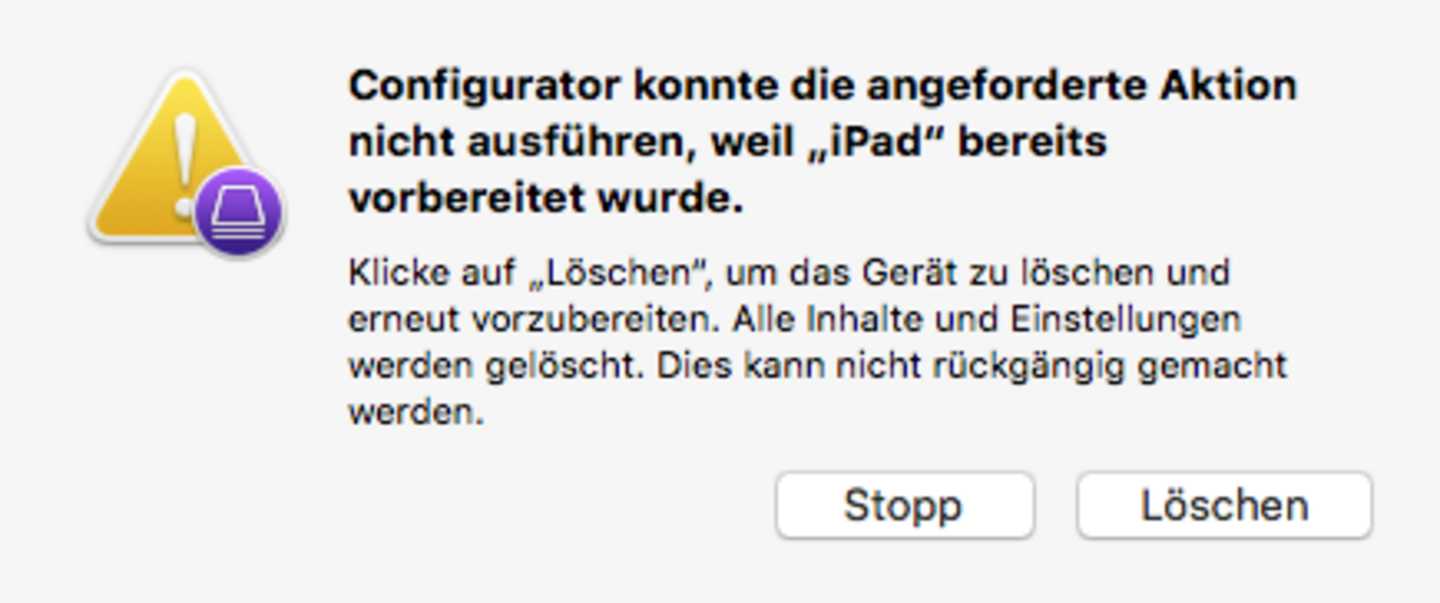
In individual cases, the error message shown at the end of the process may occur despite successful registration with the School Manager and Jamf.
In the next step, use the log-in in the Jamf School MDM to check whether your desired device can be found there and is marked as a "supervised / supported" device.
If this is the case, the registration has worked. You can remove the info message by clicking on "Stop".
The process is then still completed successfully and the device is registered.
Display device in Jamf School
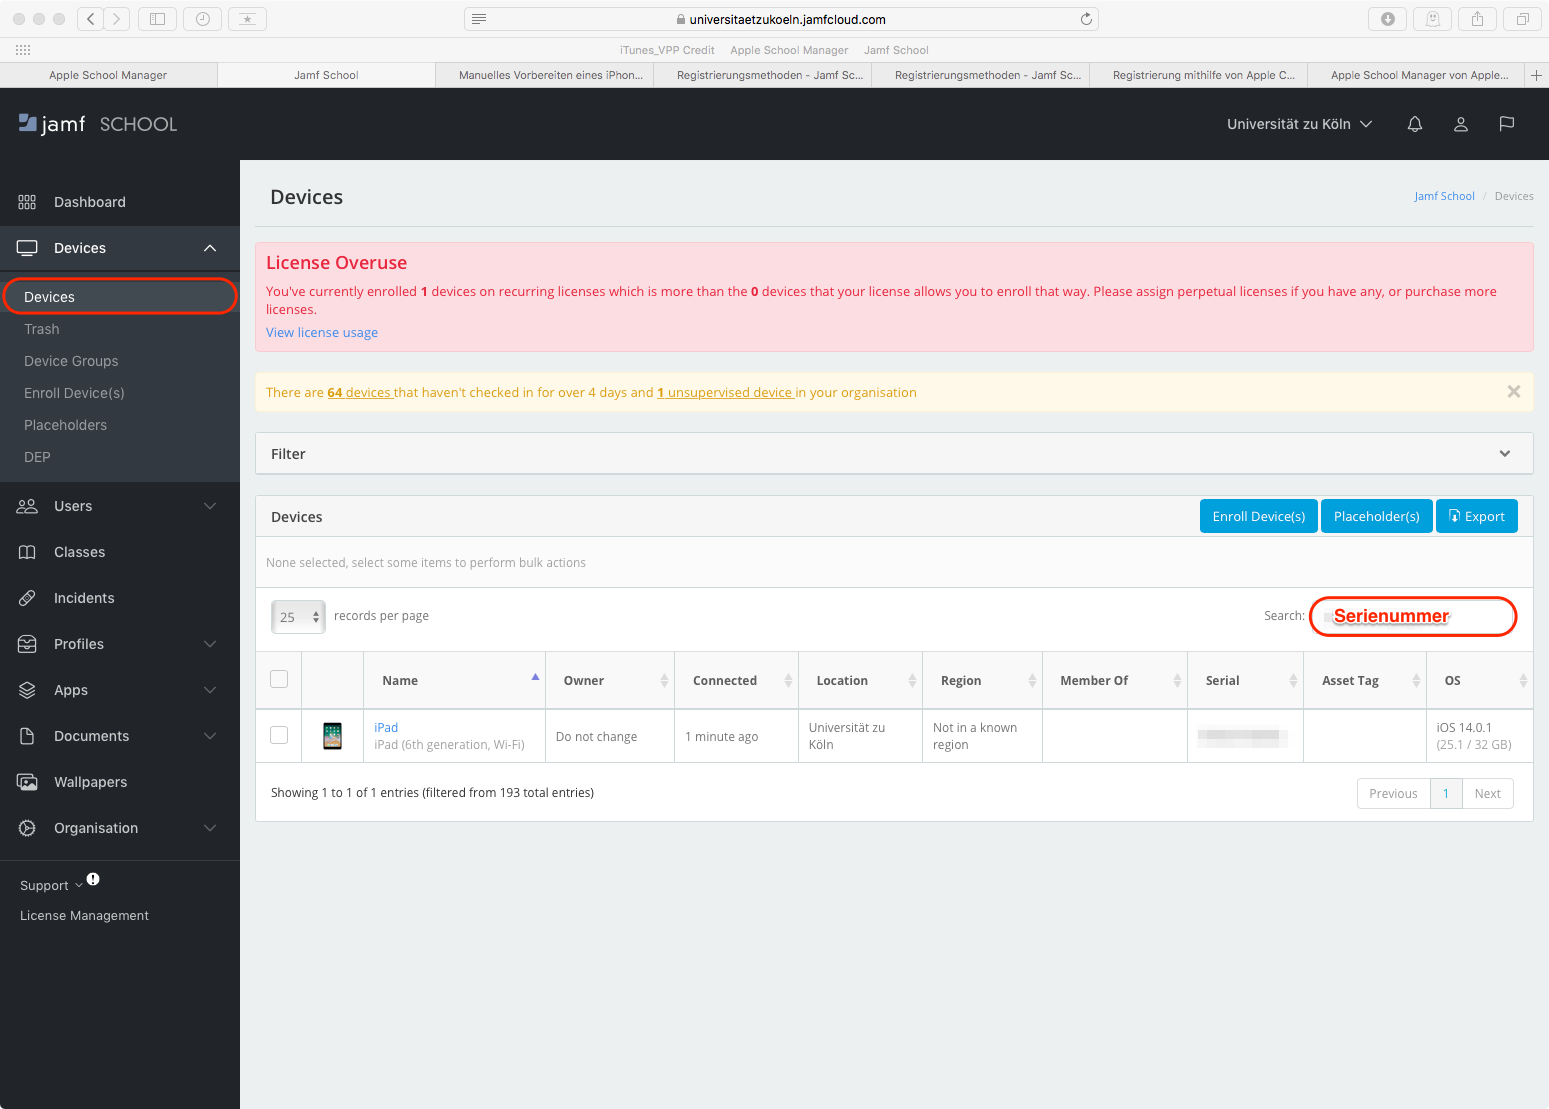
- If the Apple Configurator did not give an error message , the registration was successful.
- Now check if the device is registered in Jamf School.
- Enter the serial number of the iPad under Devices . You can copy the serial number of the device in the Configurator under Info or type it on the back of the device.
Assign device in Apple School Manager
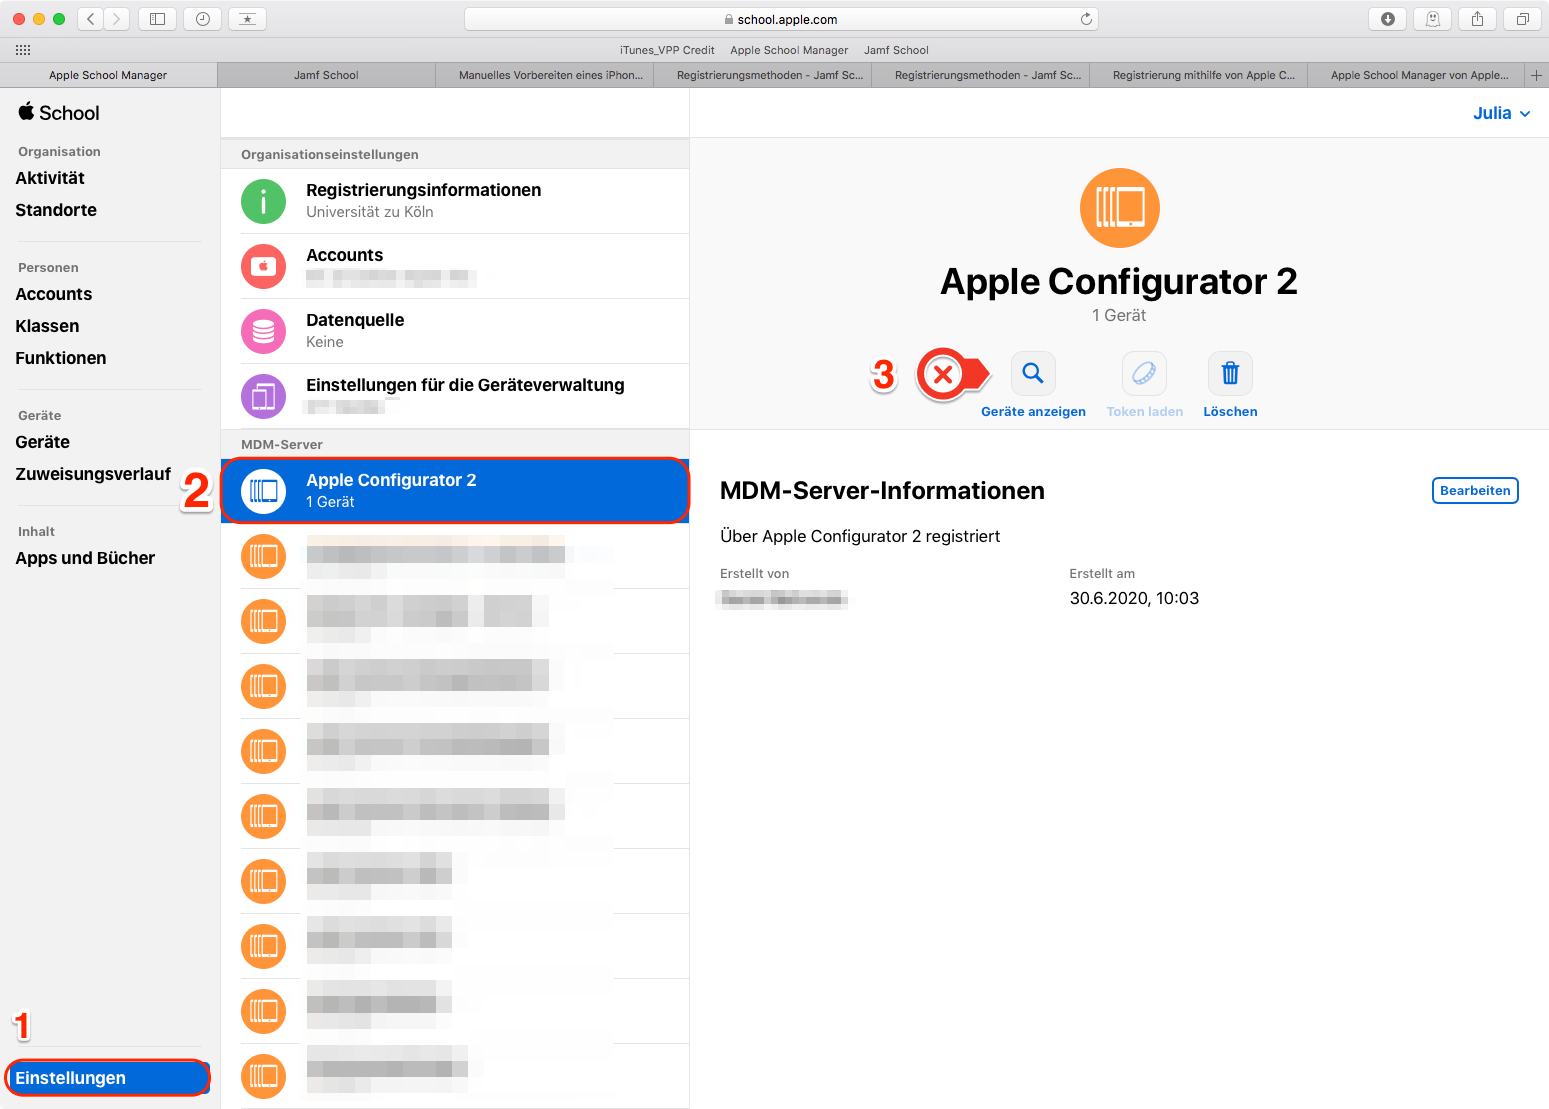
- To assign the iPad you have just registered to your institute / project or similar, log in to the Apple School Manager.
- Under Settings - select the MDM Server Apple Configurator 2.
- Use the magnifying glass icon to display the devices.
Assign device to location
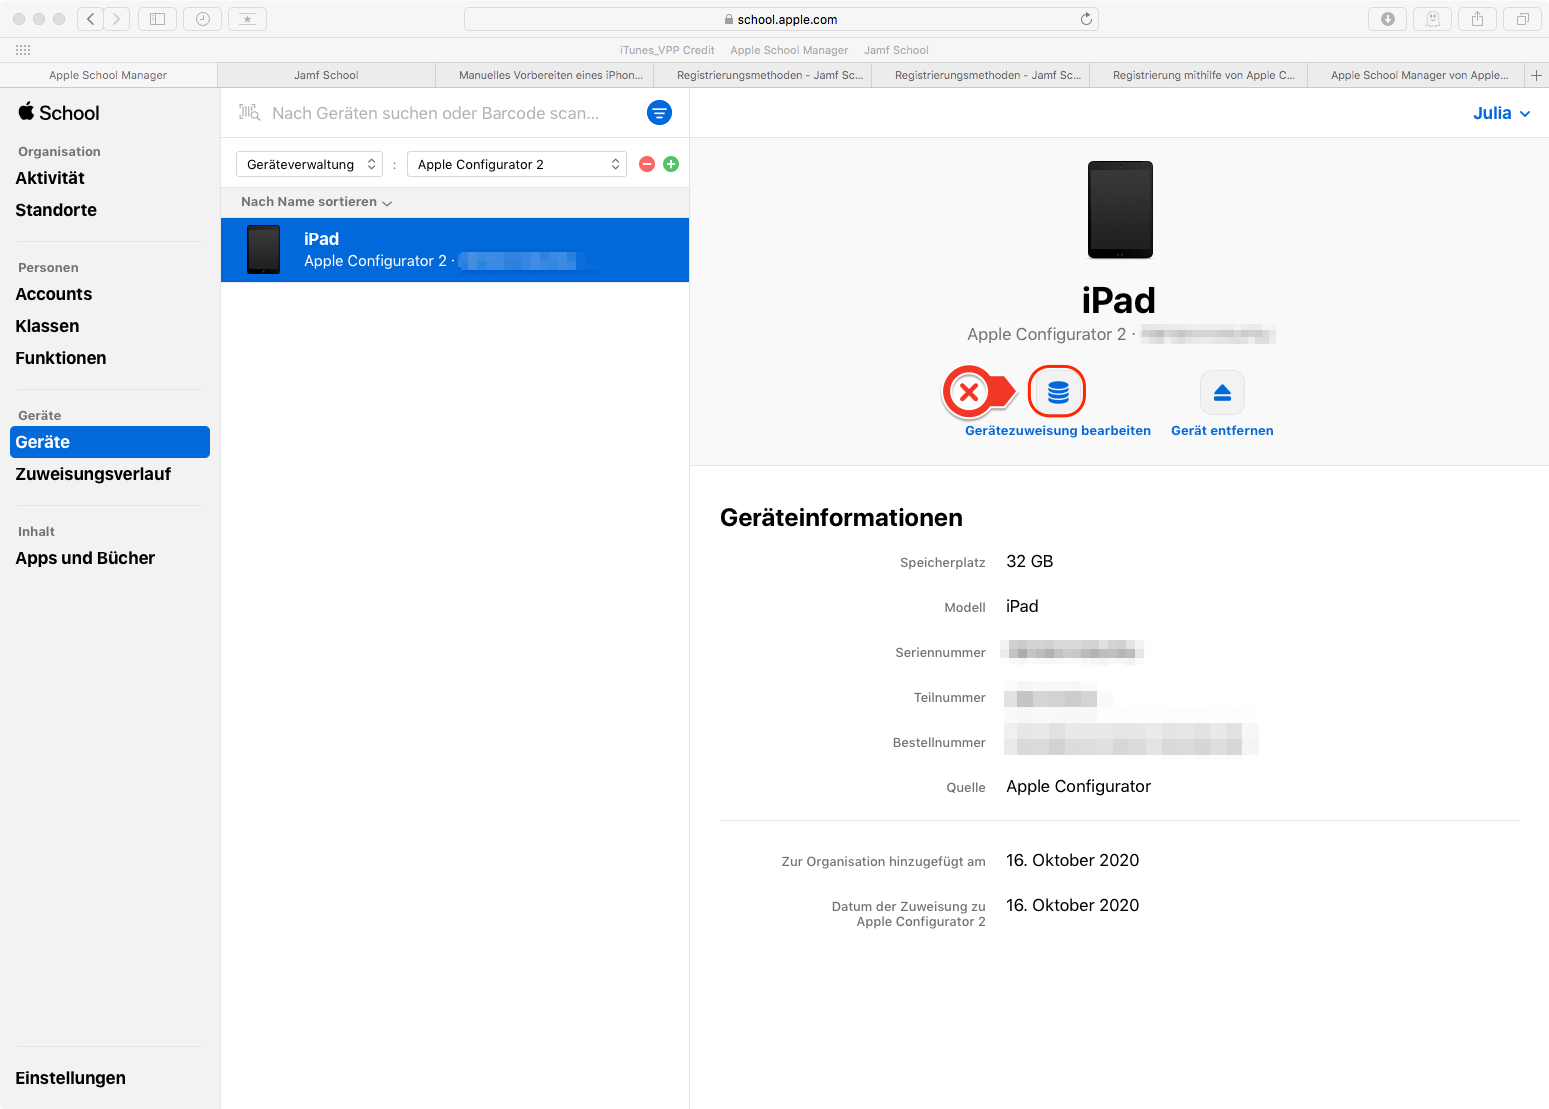
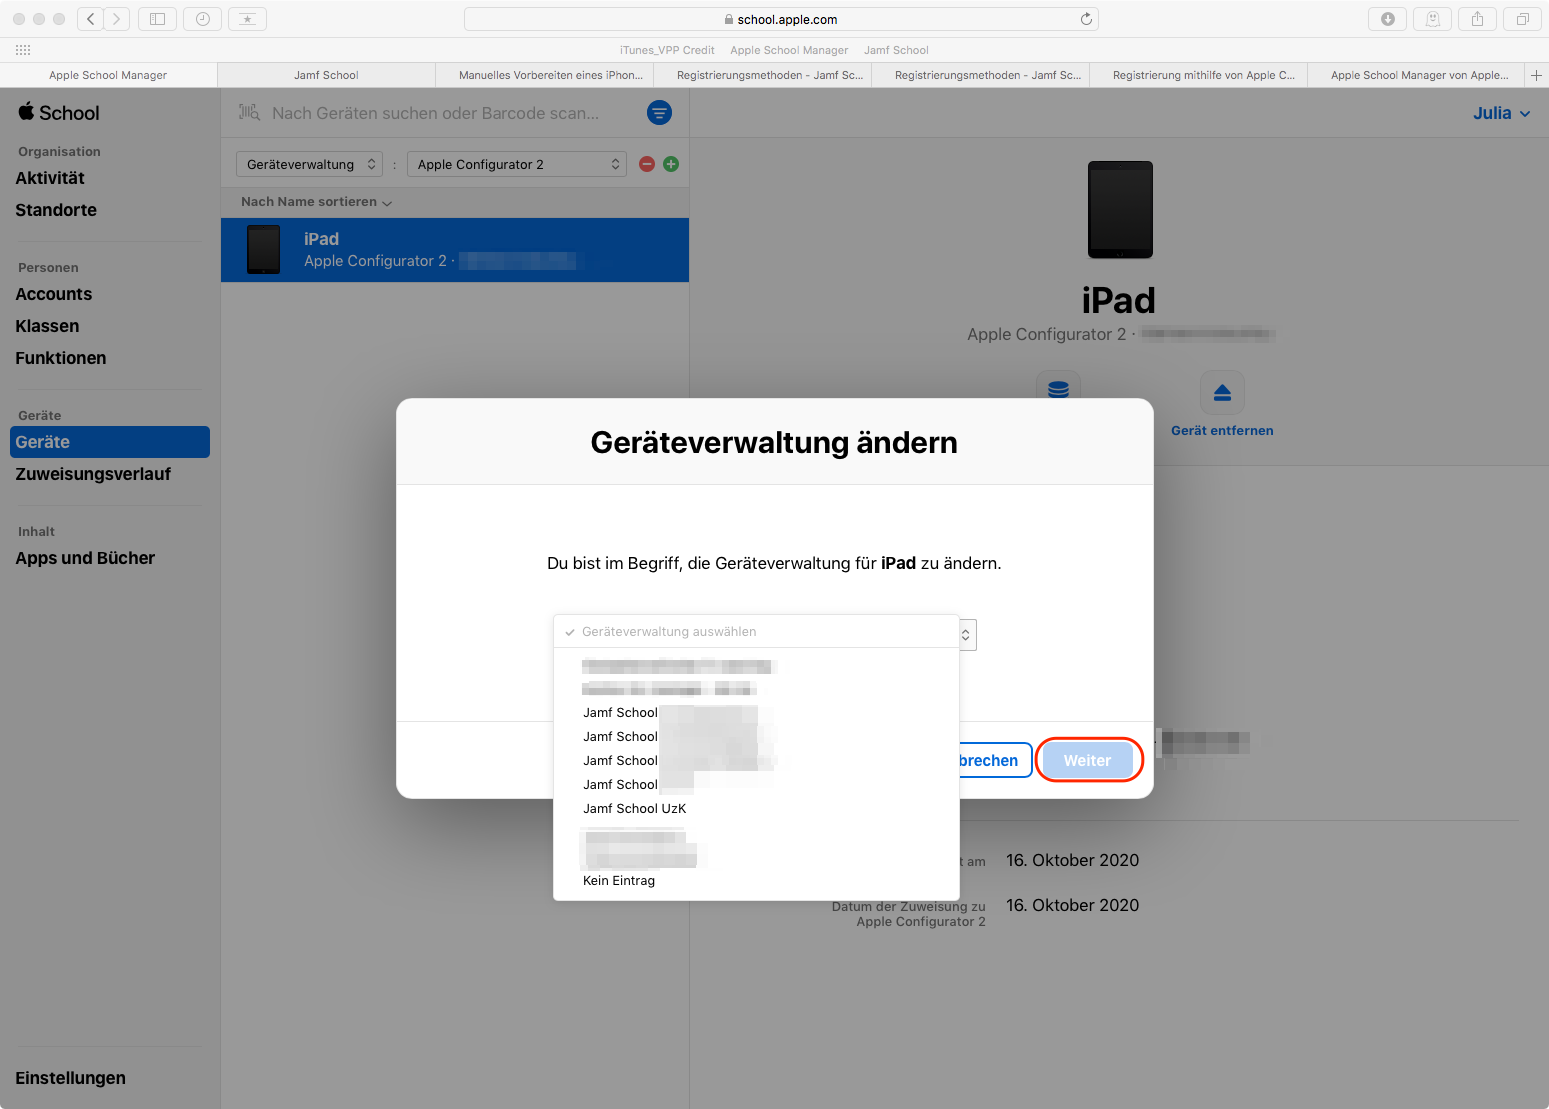
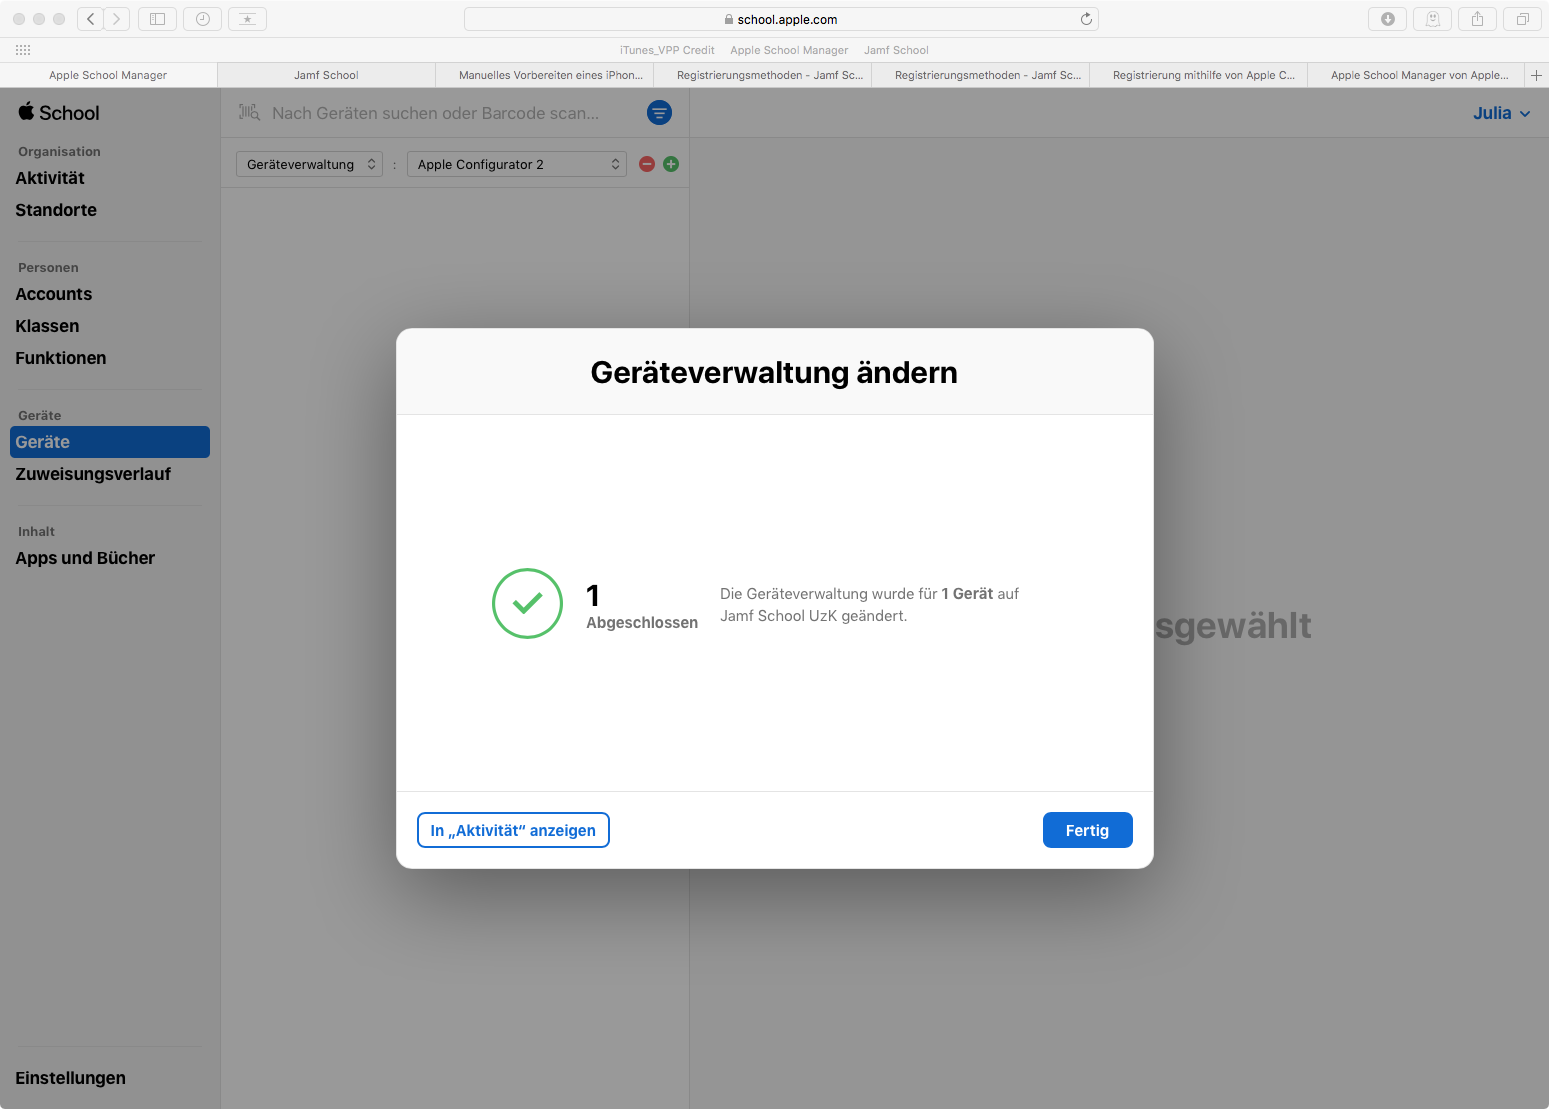
- Identify the device by its serial number, select it, and click Edit Device Assignment.
- In the window that pops up, select your MDM server. We have previously created this for you in consultation, so you should be able to recognize it easily by its name.
- If the assignment is successful, you will receive a corresponding feedback from the School Manager.
Note 30 day transition period
At this point, the note from the preface is repeated:
There is a transition period of 30 days for manually added devices to Apple School Manager. Within this period, you can release the device again and remove it from School Manager without any problems. Otherwise it will remain permanently in School Manager.
Contact
If you have any questions or problems, please contact the ITCC-Helpdesk