Editing Identities in the Webmail System
This guide explains how to set up an address for outgoing mail that is different from the standard format of username@smail.uni-koeln.de or username@uni-koeln.de.
Both e-mail aliases (e.g. firstname.lastname@(smail.)uni-koeln.de) and mailing lists (e.g. department-of-examples@uni-koeln.de) can be used as alternative addresses.
Aliases and mailing lists will have to be active at the time of their registration as an alternative identity.
To set up a personal e-mail alias, please use uniKIM. To apply for a mailing list, please use the application form.
Navigate to Identity Management
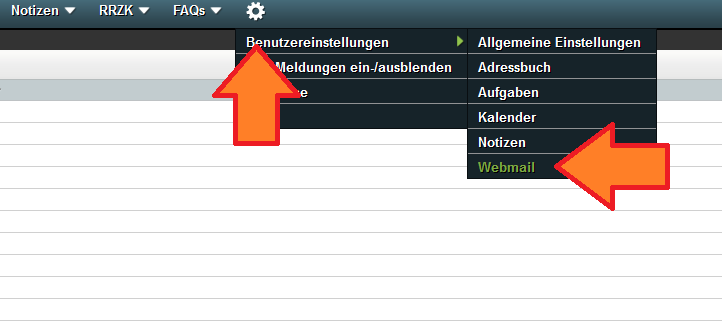
Log on to Webmail with your user name and password.
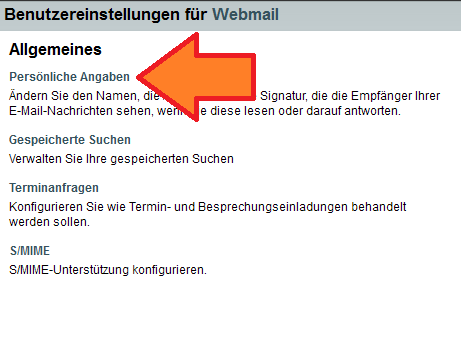
Navigate to the identity management settings via
- Gear symbol
- Preferences
- Mail
- Personal Information
Set Up a New Identity
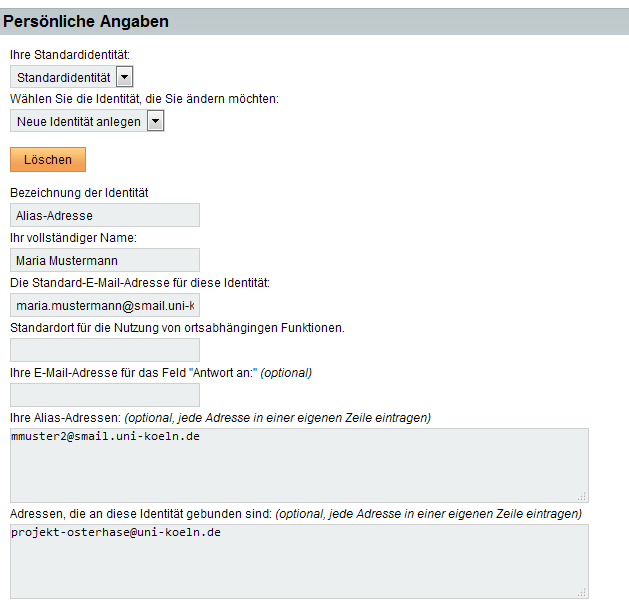
Open the drop-down menu under "Select the identity you want to change“ and select "Create new identity“.
Fill in the other boxes as follows:
Identity’s name
The name you want to use to label the identity in your overview. Later, this will be useful to differentiate between different identities in case you choose to use more than one. You may want to use a name that will help you distinguish your identities later, e.g. My Alias Address.
Your full name
Your first name (, middle name,) and last name, as they will be displayed to recipients of your e-mails. If you want to use academic titles or job titles such as Prof. Dr. or Head of XY, you may add them here.
The default e-mail address to use with this identity
Please put in the e-mail address you will want to use with this identity. Usually, this will be an alias address or a mailing list. Please note that the address you choose for this will have to exist and be active by the time you register it for this new identity. This may take up to three hours after setting the alias in uniKIM or notification that your mailing list has been created.
Boxes marked „optional“
Most of these boxes may be left blank for most purposes. If you think you may need to configure one or more of them, please consult our Advanced Settings Guide.
Your signature
You may enter additional professional information here which will be displayed at the bottom of each e-mail you send using the new identity. Alternative methods of contact (i.e. e.g. phone, fax, mailing address, instant messenger names) or URLs to the institution website are common entries here. Try to avoid long disclaimers regarding data protection.
Save sent mail?
This box should be ticked in the vast majority of cases. Your sent mail will not be accessible to you if this box is deactivated.
Sent mail mailbox?
Your selection here determines which mail box will be used to store e-mails sent using the new identity.
(If required, you may also choose another mail box than the one selected here for individual e-mails while composing them. If you do so, please bear in mind that this will have to be repeated if you want to use two different mail boxes to store mail sent from one identity.)
Depending on why you may use two different identities, there are two practical ways of managing sent mail mail boxes:
1. If you work in two different departments (e.g. one part-time position at Department X and another one at Department Y with two different aliases or mailing lists), you should consider choosing two different mailboxes when setting up either identity here to separate thematically different correspondences. In this case, you will see two different mail boxes named "Sent“ in your inbox overview. You will be able to distinguish between them by hovering on either one with the cursor, as this will display their actual names (e.g. "Sent Mail Department X“).
2. If you prefer a chronological order for your sent mail regardless of their institutional attribution, you can choose the same mail box here for both identities.
Click on "Save“ to save your settings and create the new identity.
Verify Your New Identity
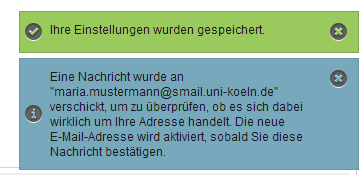
Upon saving your new identity there will be a blue notification on the right side of your screen saying that a test e-mail has been sent to the address of the new identity to verify that you have access to the corresponding inbox. (If the notification disappears too quickly for you to read it in full, you can access it again by navigating to
- Gear symbol
- Toggle Alerts Log
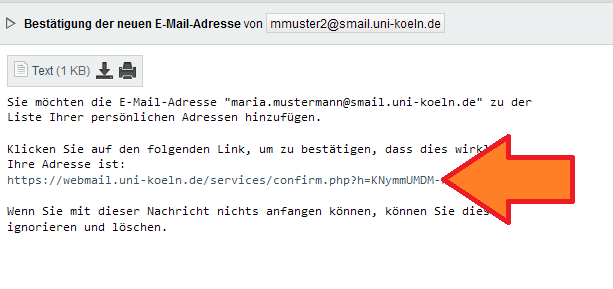
Navigate to your inbox by clicking on the UoC logo and "Go to your inbox“. Open the test e-mail. If you have not received an e-mail yet at this point, please click the "Refresh“ button in the upper left-hand corner of your inbox.
If you do not receive a test e-mail, this is usually for one of two reasons:
1. The address you used for your new identity is not yet active. It may take up to three hours until new aliases and mailing lists are registered on our mailing server. If this time period has not elapsed, please wait and try setting up a new identity at a later point.
2. There is a typo in the address you entered when you set up the new identity. Please set up the identity again and double-check your entry under "The default e-mail address to use with this identity“.
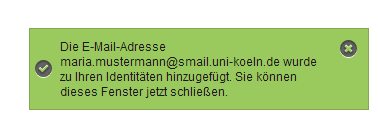
If you have received a test e-mail, click on the link it contains. A new tab will open and notify you that your new identity has been registered successfully. You may close the tab if you received this notification.
This concludes the registration process for your new identity. Depending on how you want to send and receive e-mails, further configuration may be necessary. You can find more information on your options below.
Do I Need More Than One Identity?
If you registered a new identity with the intent of always displaying you full or preferred name? In this case you may want to delete the standard identity altogether to avoid confusion.
Do you wish to always use the new identity?
In this case, please navigate to the "Personal Information“ settings again and enter your old e-mail address in the box under "Your alias addresses“ and save your changes. After that, make sure that your new identity is being displayed as "Your default identity“ in the uppermost drop-down menu.
You may then delete the old identity by choosing it from the drop-down menu under "Select the identity you want to change“ and clicking the "Delete“ button.
Do you wish to use different addresses when replying to e-mails depending on the address you received a message with?
In this case, keep both identities. Please make sure that there is no entry in the "Your alias addresses“ for either identity.
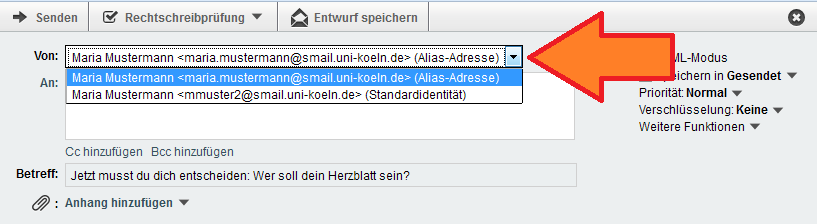
You can always choose which identity to use when composing an e-mail or replying to one previously received.
As soon as more than one identity has been registered, the „From“ line in the composing window will change into a drop-down menu from which you will be able to choose between all your identities. The default address will be the one that has been registered with the identity you choose as „Your default identity“ in the Personal Information settings.
Setting options for advanced users
In identities you can set several options, which are only relevant in specific cases. If you are working with many contact adresses for projects and want to be sure, that theses addresses are also reachable over the tenure at the University of Cologne, you can find some advices.
Differences between alias-adress and alias adresses linked with the identity
The following applies for alias-adresses:
- E-mails that carry one of the e-mail addresses listed here as recipients are considered personal e-mails and are marked with a corresponding symbol in the listing (as opposed to e-mails that do not normally receive this identification).
- Because alias adresses apply as personal e-mail adresses, this e-mail adress will be deleted from the list of recipients, when you use the function reply. This is in contrast to the addresses bound to the identity, which are not regarded as a personal address but can represent a distributor for addressing an entire group of persons.
- If an e-mail is received whose recipient address is listed in the list of alias addresses of an identity, the associated identity is preselected when the email is answered. You can reply to an E-Mail automatically with diifferent options (signature, name, automatically copies, ...) depending on which of your recipient addresses this email was sent to. For example: You got married and took the last name of your partner. Then you could create an identity that has entered as a full name, for example: Maria Mustermann née Gabler and have this identity used automatically if someone else writes to your old address. You could also include a note like this in the signature: Please note that the email address maria.gabler@uni-koeln.de is only valid temporarily. In the future you can reach me instead at maria.mustermann@uni-koeln.de. Please include the new address in your address book.
For addresses bound to identity:
- If an e-mail is received whose recipient address is listed in the list of addresses bound to the identity, the associated identity is preselected when answering this e-mail. This allows you to respond differently to e-mails sent to a specific address (such as the contact address of a project you manage) than to normal e-mails.
- E-mails sent to an address entered in this field are not considered as personal messages. Therefore, you do not have the icon for personal messages in the email overview (unless the email was also sent to other addresses, among which was one of your personal addresses).
- Due to the classification as impersonal addresses, addresses bound to the identity are not removed from the recipient list when you use the Reply to All function. For example, if you want to maintain a contact address for a project together with a colleague, and if you want a copy of the answer to be sent to the contact address (and thus also to the colleague for information) when answering a request, you can create an identity that contains the contact address as an address bound to the identity. You can combine this particularly well with the function your e-mail address for the field "Reply to:" (see below).
- Addresses bound to the identity are also well suited for the following case: You maintain the contact address for a completed project, such as projekt-osterhase@uni-koeln.de. While the project Easter Bunny has been completed, a similar project, which you are responsible for, will continue, with the contact address projekt-weihnachtsmann@uni-koeln.de. Since the contact address of the Easter Bunny Project has been mentioned in various publications, you would like to keep it, but in the longer term, to redirect the e-mail communication to the address of the new project. Then you can create an identity with the standard e-mail address of the Santa Claus project and specify the address of the Easter Bunny project as the bound address, if necessary combined with the answer-to address of the Santa Claus project. With this, further answers (such as queries) will automatically go to the more promising e-mail address.
Alternative way to work with different contact addresses
If you maintain multiple contact addresses, it can become confusing if you try to keep track of personal and impersonal messages received with multiple identities and addresses bound to the identity alone. Instead, you can use the personal icon of the webmail system to drop the distinction and create identities directly, where you enter the sender address you want in the The default email address for this identity field.
With this alternative approach, you then have to make sure that you can distinguish the different types of e-mails (personal/impersonal) by sorting them into different mail folders directly when you arrive at the mail server. Create your own e-mail folder for all contact addresses you maintain, for example Project Easter Bunny and Project Santa Claus. Then you can create filter rules via the mail portal (Smartsieve - mail filtering for experts), which store the emails that carry the respective recipient address directly in the appropriate folder. If you do this consistently, only the personal e-mails remain in the incoming mail folder. (In special cases, such as messages sent to the contact address via "Bcc:", this filtering can also fail - either move these rare emails manually into the correct e-mail folder or you use the header list-id generated by Mailman instead as a filter criterion.) In order to keep up-to-date with the messages sorted into subfolders on the start page of the webmail system (and the smartphone/tablet view), right-click on the e-mail folder in the standard dynamic view of the webmail system and select Check for new messages.
Use the field "reply to"
The "Reply to" field allows you to specify when you write an email that replies to this email should go to a different address instead of the registered sender address as usual. The recipient may also disregard the request to send the reply to another address; However, this is usually taken into account. This allows you to react flexibly to incoming e-mails and ensure that e-mails cannot be processed by just one person.
For example: If you have had your own contact address set up for certain functions (for example the secretariat) so that requests directed to this address can be processed by several persons (even in the case of holiday or illness), it will nevertheless not be possible to prevent individual requests from going to the personal address of a person, although they would have been better at the contact address. Or imagine that you know that you are going on holiday tomorrow, but in order to answer a question that has just come in, a question to the questioner is necessary and the final answer will therefore only be able to give your representative. If this occurs more frequently, you can create an identity with which you have entered in the field Reply to the contact address. Thus, when answering such a misdirected request, you only have to remember to select the correct identity from the box in the line from and already go to the desired contact address instead of to your personal address.
Another example: If you frequently send newsletters to a larger number of recipients, you will be aware of the problem of getting a whole stack of mostly uninteresting automatic emails back (there are always a few recipients whose email address is not available or who send an automatic notification of absence). To avoid this, you can create an identity that has a specific contact address as the sender, to which the automatic responses will then also go, while the responses that are of interest to you (those that have been given by people) are redirected to a different address via the Reply to field instead. This way you can easily separate the chaff from the wheat.
Snares
Identity is not automatically selected
When you optimize the process of e-mail processing using identities, so that identities with appropriate settings are automatically selected for replies to certain mails, it can happen in rare cases that this does not seem to work. For example, if you rely on the Webmail system to respond automatically when you reply to an e-mail that was sent to projekt-osterhase@uni-koeln.de, and this does not happen in a particular case, this may be due to the fact that the identities are case sensitive (at least the part to the left of the "@" sign).
So if you are processing inquiries in a team and one of your colleagues uses the spelling Projekt-Osterhase@uni-koeln.de instead of projekt-osterhase@uni-koeln.de, the automatisms would not work (in the delivery of e-mails the case is not important, so you already receive the message, but in the assessment whether a certain address defined in your identities was the recipient address). You can then usually help yourself by entering all the spellings of the address used in the field for the alias addresses or the addresses bound to the identity. Since you can enter several addresses there (one spelling per line), even in these rare cases an automation of the e-mail processing is possible.
Posted mail folder misrepresentation
Error in the appearance of the sent mail folderIf you have sent e-mails with your default e-mail address as sender in the past, for example mmuster2@uni-koeln.de, and now only send e-mails with the alias address, for example maria.mustermann@uni-koeln.de, the appearance in the sent folder may seem strange to you. Only the newer e-mails sent will be displayed in the To column with the recipient name, whereas for older messages in the same field only From: "Your old sender" is displayed.
If this happens to you, it is because you no longer have an identity that contains your old address. However, the latter is a prerequisite for the Webmail system to be able to recognize the emails in the Sent folder as messages sent by you. To make all emails in the Sent folder appear uniformly, edit the identities so that all addresses you have ever used as the sender address are listed in at least one of your identities, for example, in the Your Alias Addresses field. In this field you can also enter several addresses in a row (one per line). After you have done this, the appearance of the sent folder is again uniform.
Contact
If you have any questions or problems, please contact the ITCC-Helpdesk