OTRS instructions
Basics and instructions
1. Basics
OTRS stands for Open Technology Real Services (OTRS) and is a trouble ticket system designed to support employees in processing customer inquiries. It is an open source web application that can be used with any browser.
OTRS is designed for use in a service center whose employees (agents) provide first-level support. Customers send their requests by e-mail to a central service e-mail address. This mail is created as a ticket in OTRS and assigned a unique processing number. All processing steps of the agents and customer queries are recorded in so-called articles. OTRS places these requests in the corresponding queue based on the destination address, the so-called OTRS queue. The tickets are collected in this queue and archived for three years. Agents can process one or more queues.
2. Login
The OTRS agent login can be found at https://otrs.rrz.uni-koeln.de, the login is done with the personal account. Certain authorizations are associated with the user account, including which queues an agent may edit and/or view or to which queues a ticket may be moved. It is also possible to log in to the customer interface. Both staff and student accounts can be used without prior registration to send an e-mail support request to a specific queue directly in the interface. The customer interface can be found at https://otrs.rrz.uni-koeln.de/otrs/customer.pl. As an alternative to the customer interface, an e-mail can of course also be sent to the e-mail address assigned to the queue.
Views
3.1 Queue view
After successfully logging in, you are taken to the queue view. This view provides agents with a quick overview of the current ticket situation. All open tickets from "My queues" are displayed here first. The individual queues can be selected separately in the queue view to filter the tickets, as shown here in the screenshot.
You can also change the size of the preview view (S, M, L) and filter by blocked, available and closed tickets and sort by name or age. In the header of the backend, there are icons indicating the number of blocked and monitored tickets by the agent.
Editing tickets
Various helpful functions are available for processing tickets. In addition to the function to answer requests in the team, there is the option to manually block tickets, set them to "Wait" and assign them to other agents, as well as attach notes for internal information. In addition, similar requests can be merged into one ticket, tickets can be moved to other queues or notes about phone calls can be attached.
4.1 Ticket status in general
A ticket always has a defined processing status. The status of a ticket can be "open", "closed" or "waiting":
- "Open" are unprocessed tickets or tickets that are still being processed.
- "Closed" are mainly tickets that have been explicitly set to the closed status after complete processing (e.g. answering the request).
- For example, tickets that require internal or external information can be assigned to "Waiting" (further information on this can be found under 4.3 Ticket status "Waiting".
Closed tickets are removed from the active view, but remain in the "Closed" view for 30 days from the time they are closed before they are moved to the archive. Archived tickets are only accessible via the archive search (see point 6.). After a period of 2 years, they will be permanently deleted.
4.2 Answering tickets
To edit a ticket, you must first go to the content page of a ticket. All information relating to a ticket can be viewed by clicking on the corresponding ticket.
The content of a ticket consists of the full content of an article, detailed customer information and the history, i.e. the chronological overview of the processing procedures.
In the ticket detail view, clicking on "Answers" opens another selection field. As a rule, "empty answer" is selected here to generate an empty ticket answer and formulate an individual answer. The answer is written in a pop-up window. Click on "Submit" to send the email to the customer.

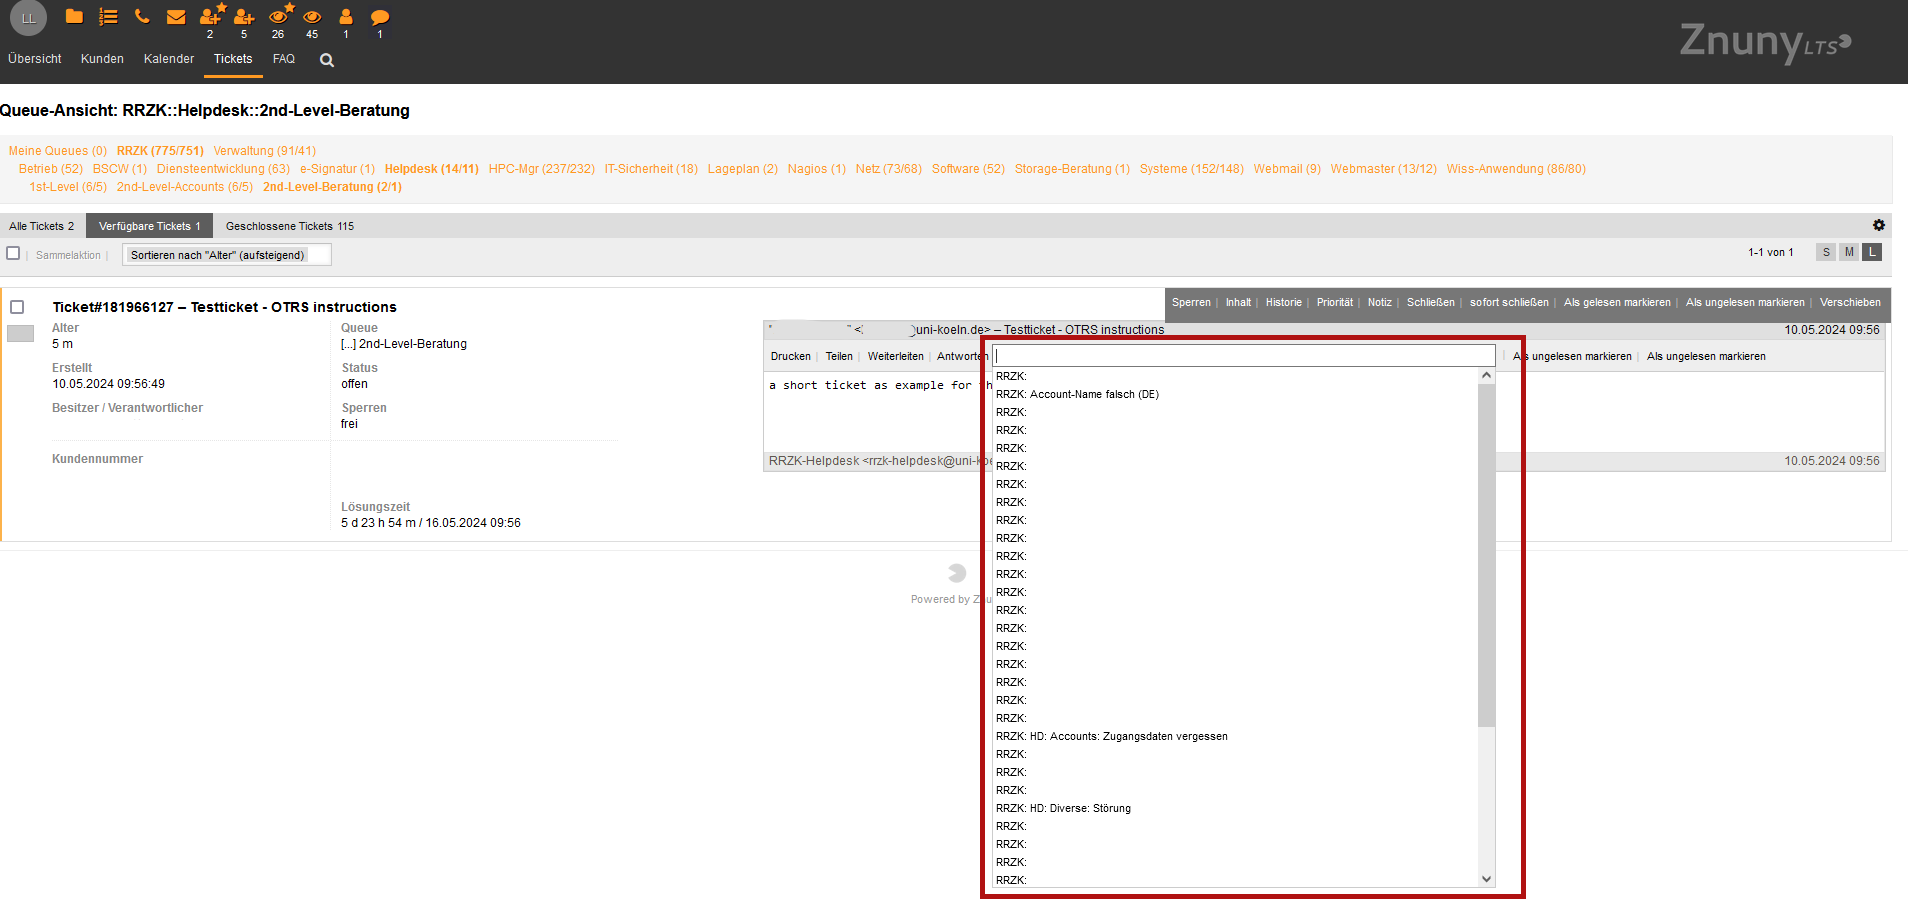
The other selection fields shown here in the screenshot are pre-formulated response templates. If required, these can be defined in OTRS by the administrator in order to have a quick ticket response at hand for frequent requests.
As soon as a ticket is started to be answered, the ticket is blocked for other agents. At the same time, the agent becomes the owner of the ticket. This lock prevents multiple responses.
Tickets can also be answered directly from the queue and status view, but only in views M and L. Visually, the procedure here is only marginally different. Here too, a pop-up window opens for replying.

4.3 Ticket status "Pending"
A ticket status can also be set to "Pending" and provided with information on why and what is being waited for
If further information needs to be obtained from the user in order to process the ticket, the status can be set to "Warten auf Rückmeldung des Users" (Waiting for feedback from user).
A distinction can also be made between "Warten auf intere/externe Bearbeitung" (Waiting for internal / external processing) and notes can be attached to provide colleagues with useful information.
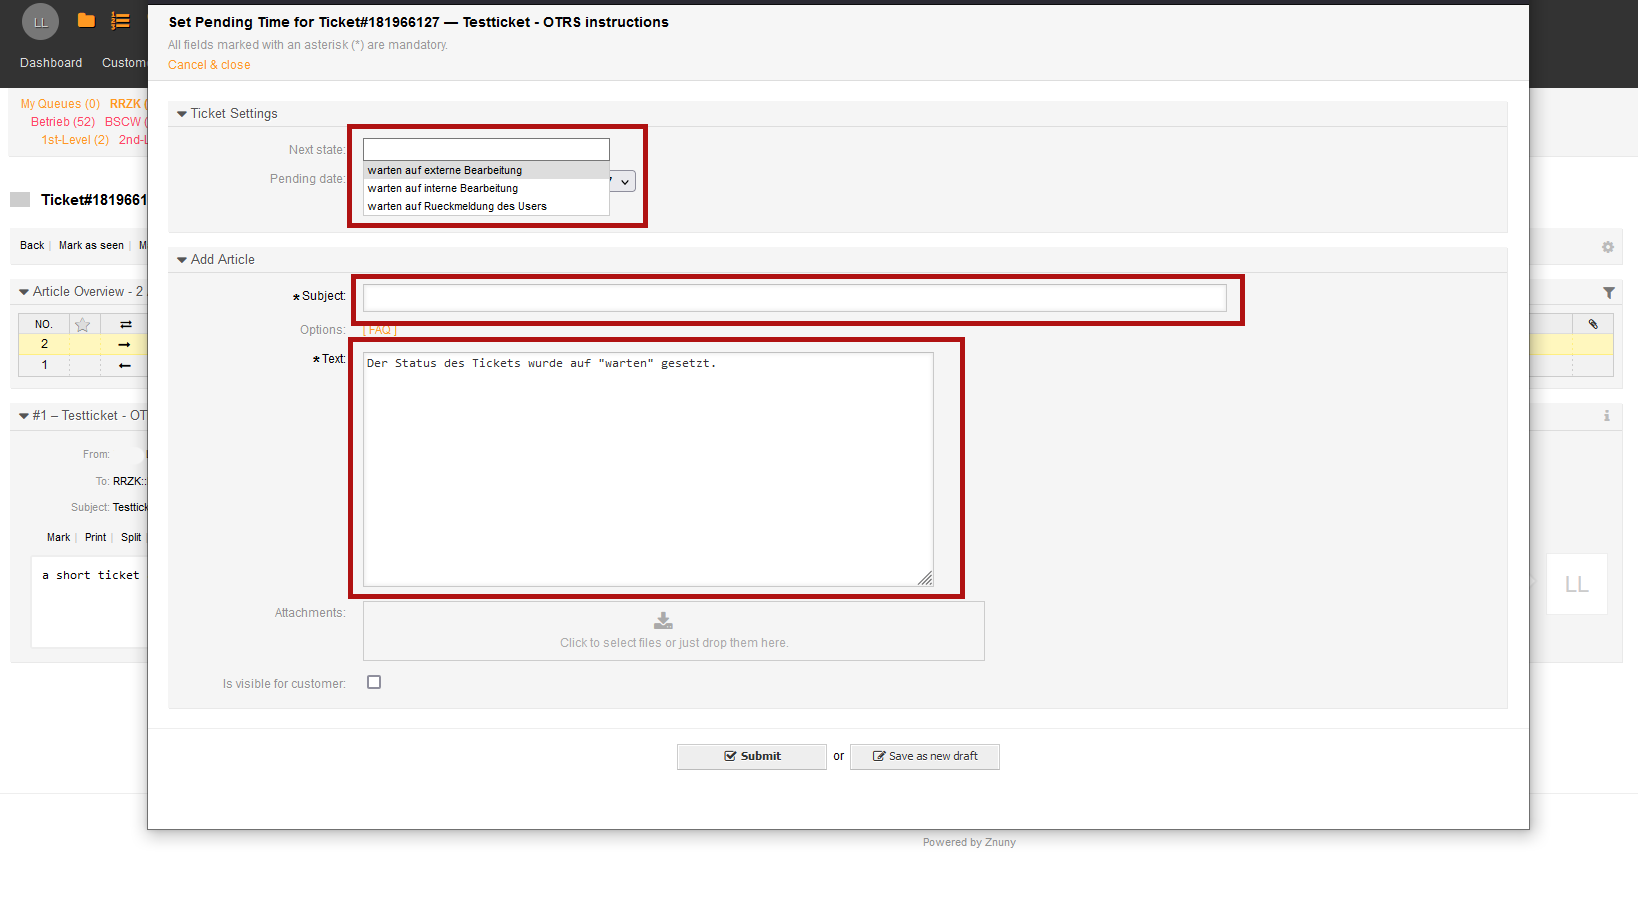
To set a ticket to "Pending" status, proceed as follows:
- Click on the ticket to access the detailed view. Select "Pending".
- Select the desired "Pending date" option in the pop-up, enter the subject and any additional information.
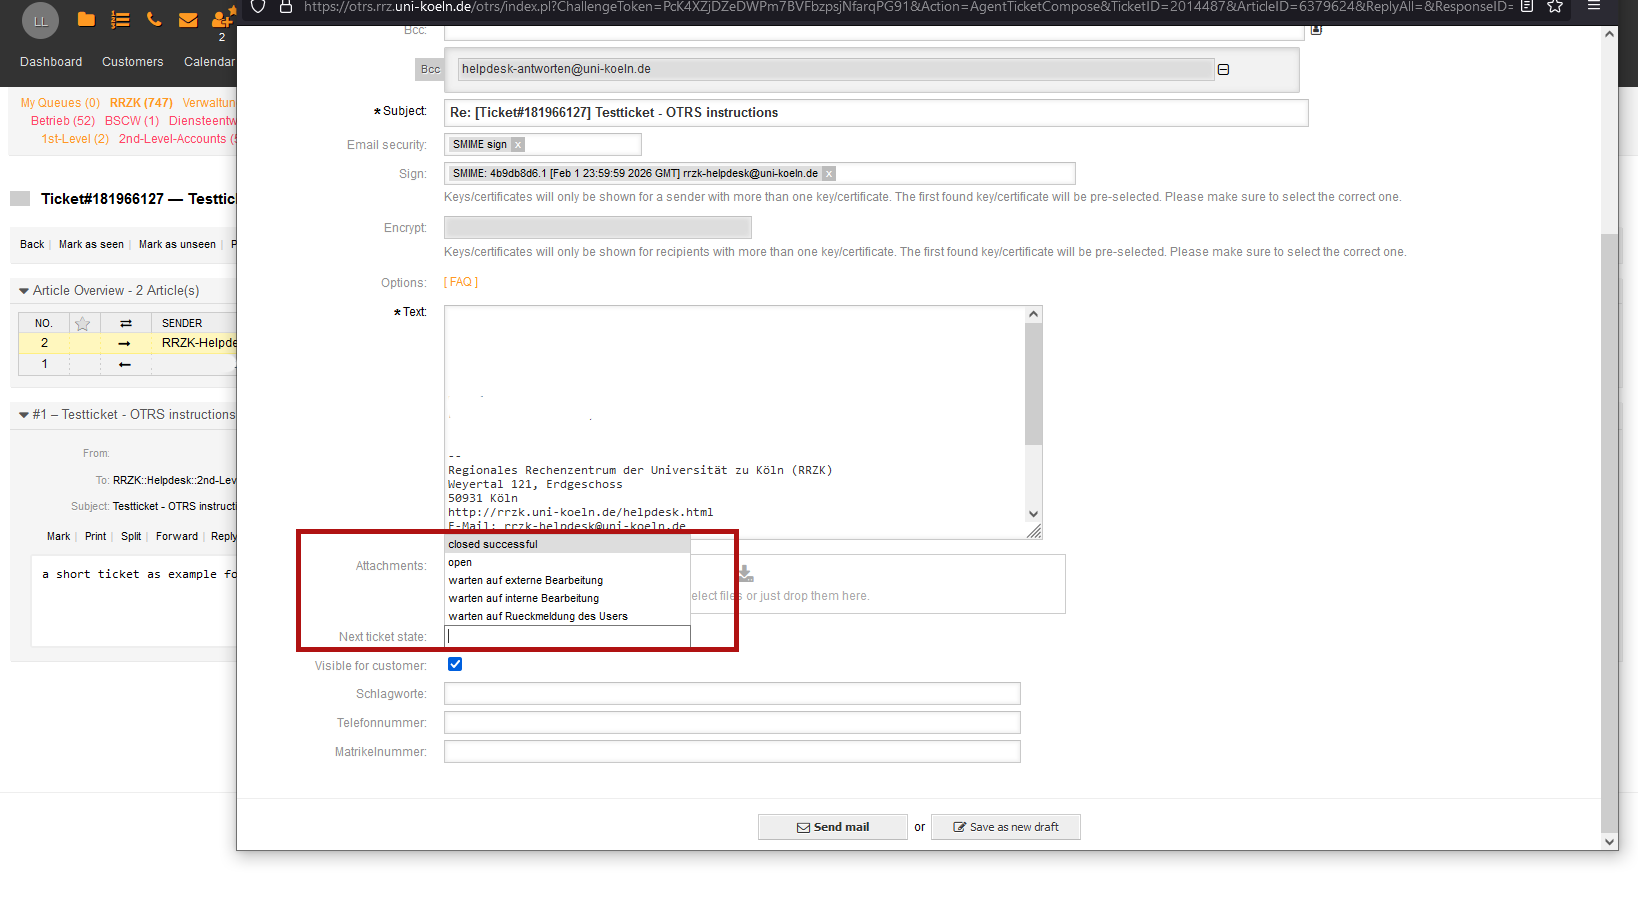
- Alternatively, when replying to a ticket, the next status of the ticket can also be set directly to "Pending".
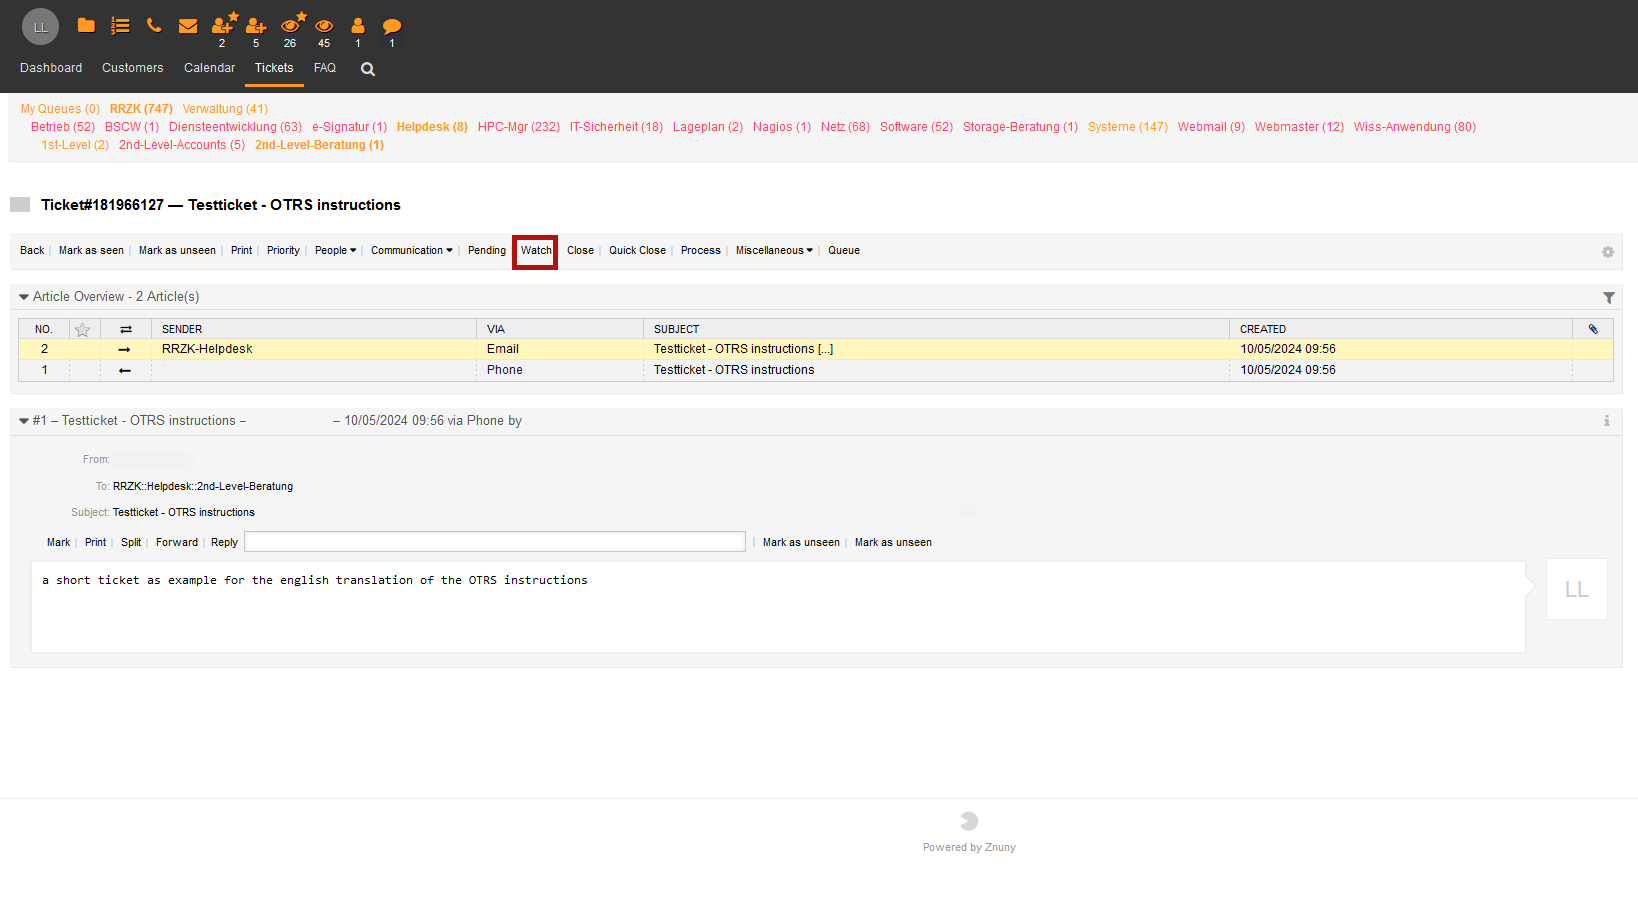
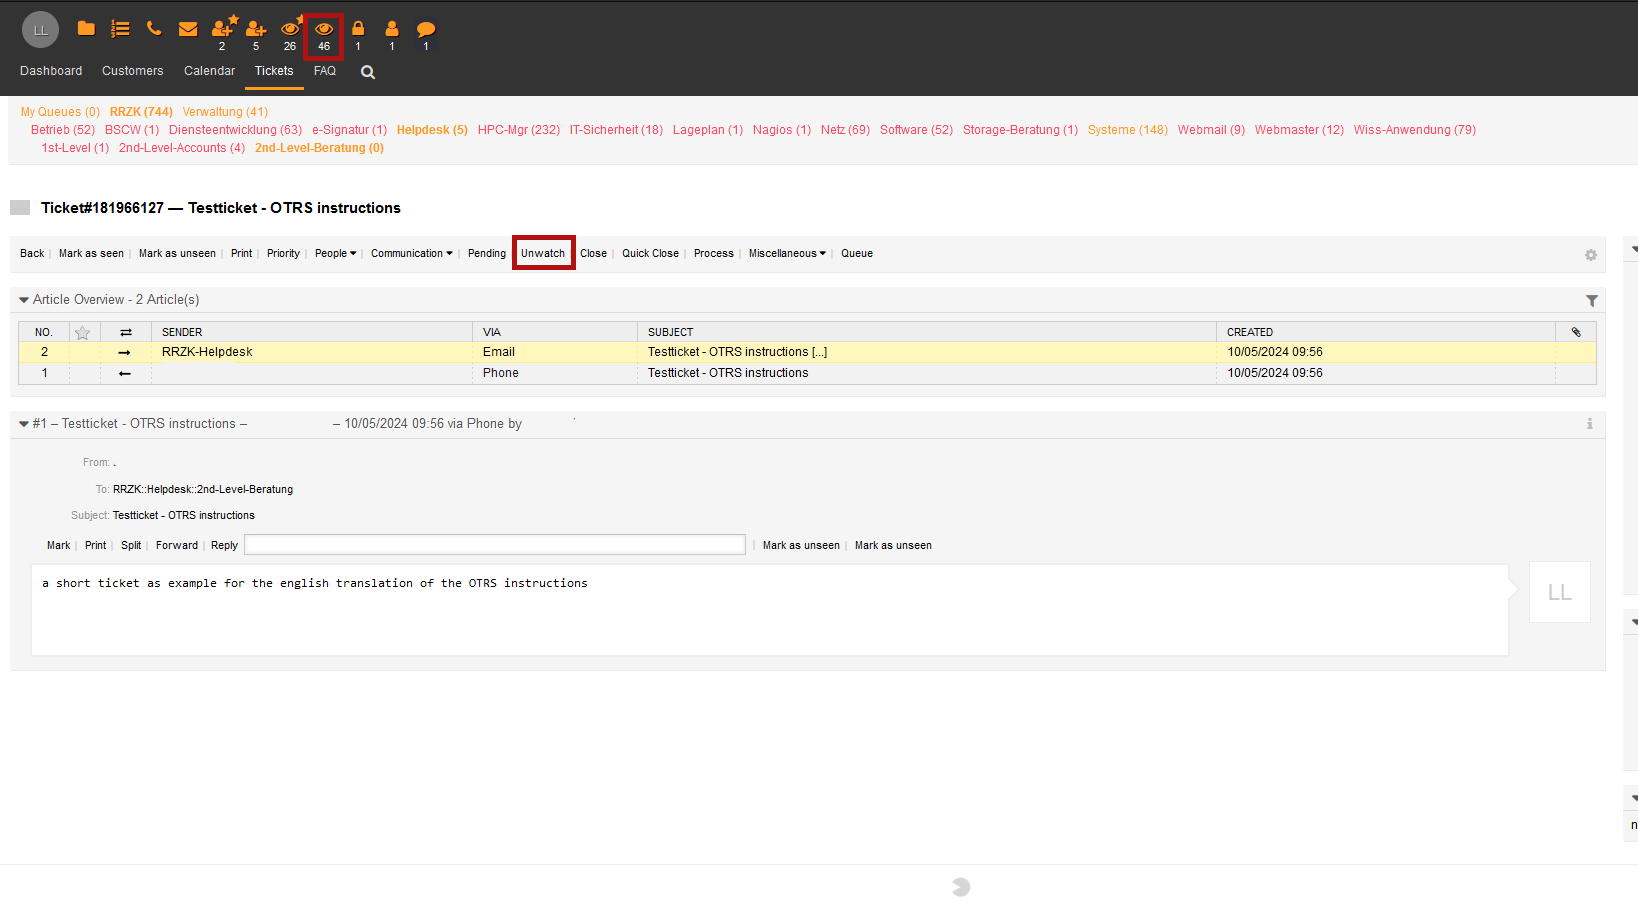
4.4 Monitoring tickets
To monitor a ticket, select the detailed view of the ticket and then click on "Watch".
This causes a new icon to appear at the top of the page with the number of tickets being monitored. The advantage of the watch function is that you are notified directly about news and processes relating to the ticket (also by e-mail if desired).
If you are not working on the ticket yourself, but are interested in the process and the associated information, the "Watch" function is a good tool. To stop monitoring, simply click on "Unwatch" in the ticket detail view.
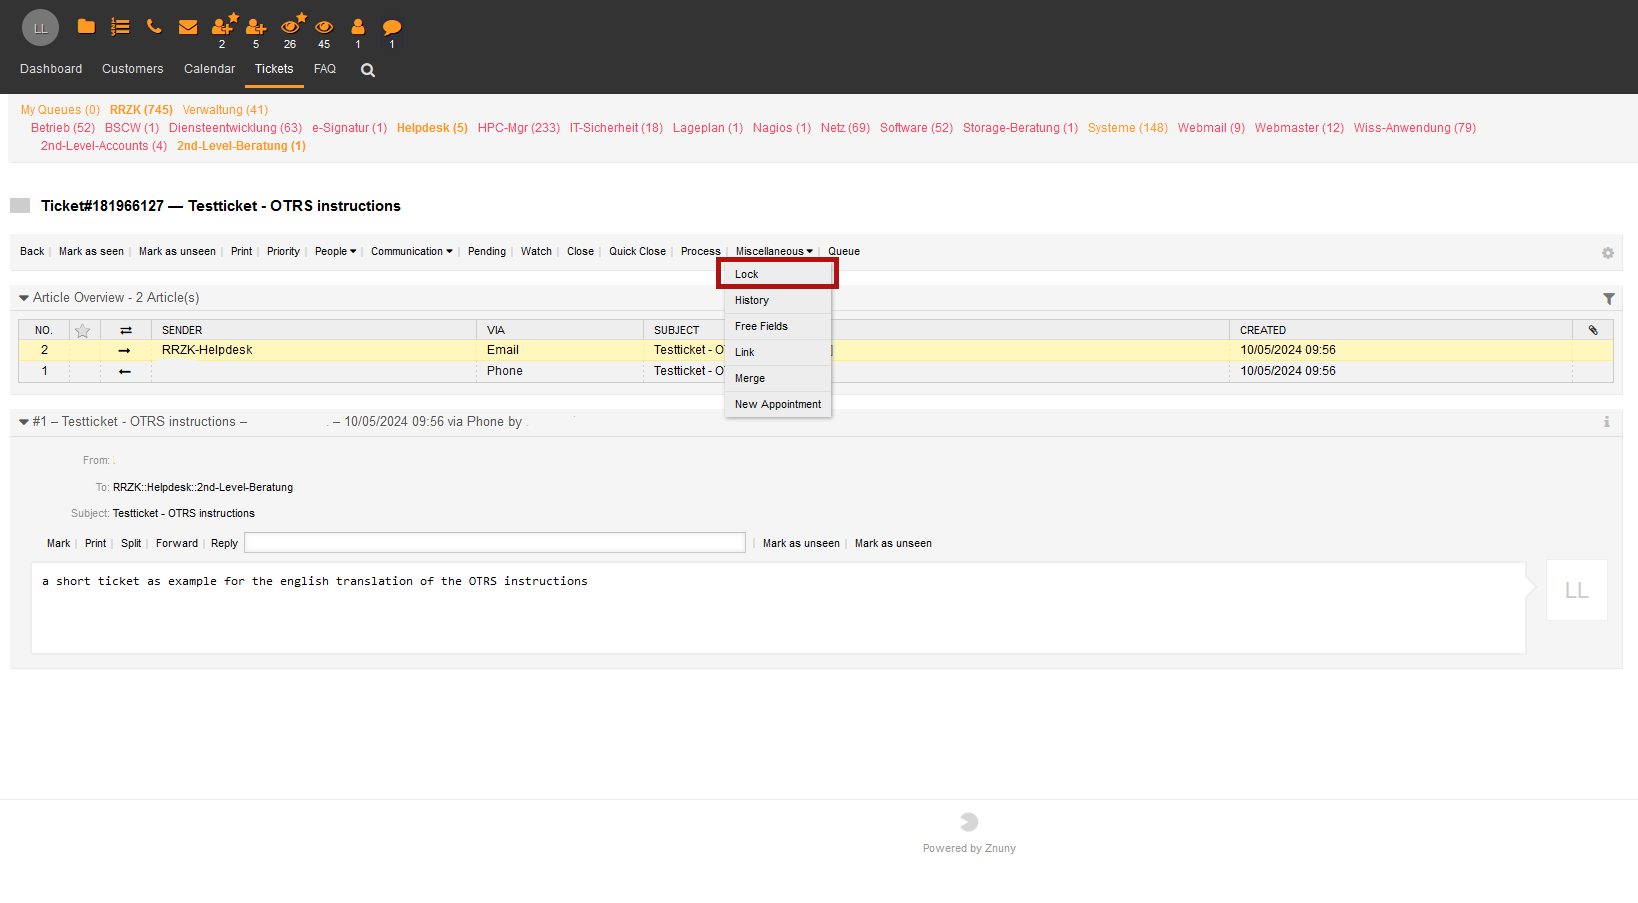
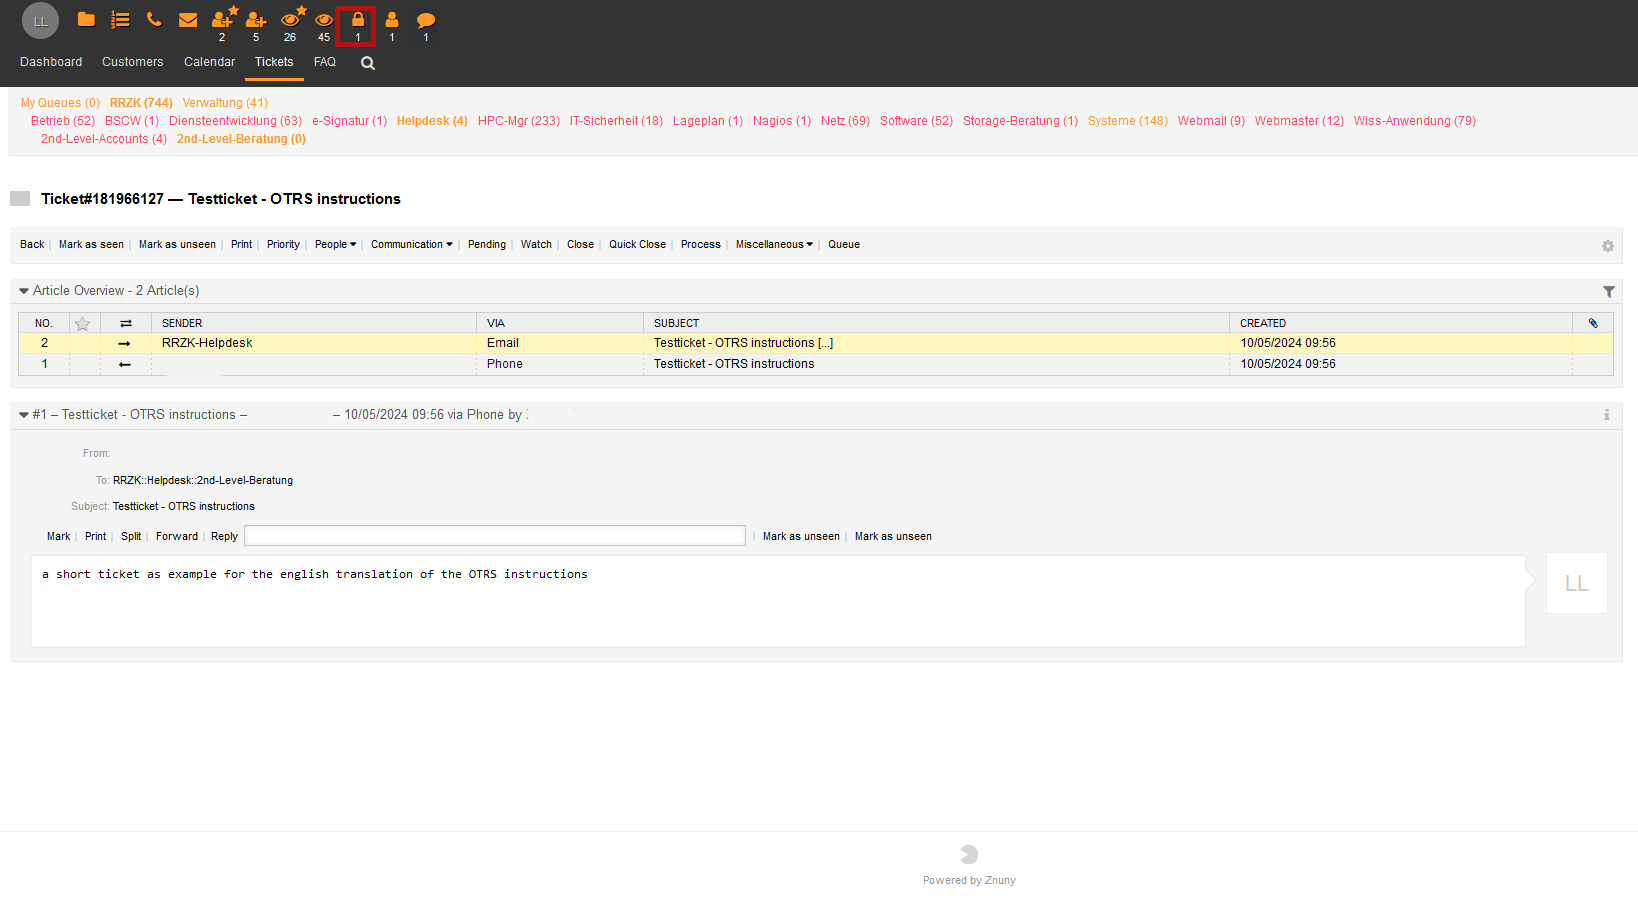
4.5 Locking tickets manually and automatically
In addition to automatic blocking, it is also possible to block a ticket manually.
To lock a ticket, select the detailed view of the ticket and click on "Lock" under "Miscellaneous". By locking a ticket, you take possession of the ticket, as it were, and information icons appear in the header.
A ticket is automatically locked by the system if one of the functions is used: Reply, Priority, Wait, Queue, Summarize, Note. Locked tickets that have the status "open" are released by the system after 12 working hours by default. This release time can be set individually for each queue by the system administrator.
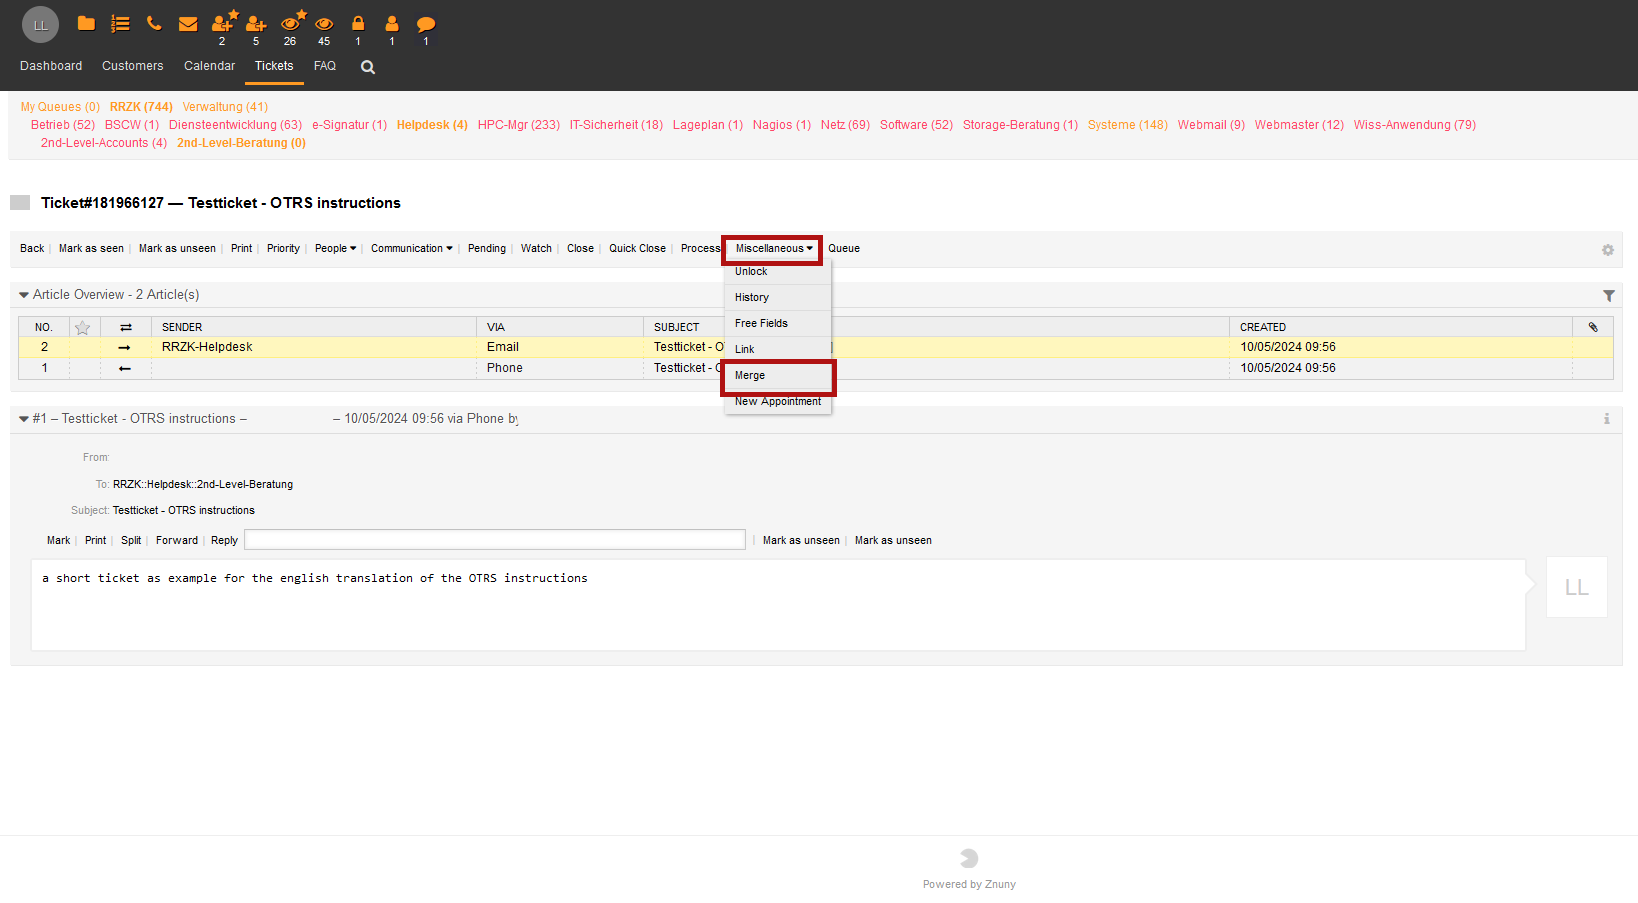
4.6 Merging or splitting tickets
The "Miscellaneous" section also offers the function of merging one ticket with another. This is useful if a customer has sent another email about the same or a very similar issue and another ticket has therefore been created. The customer's message can be manually merged with the original ticket. To do this, the original ticket number must be entered in the field provided. Alternatively, it is possible to select the relevant tickets in the status and queue view and merge them using the "Merge to oldest" function.
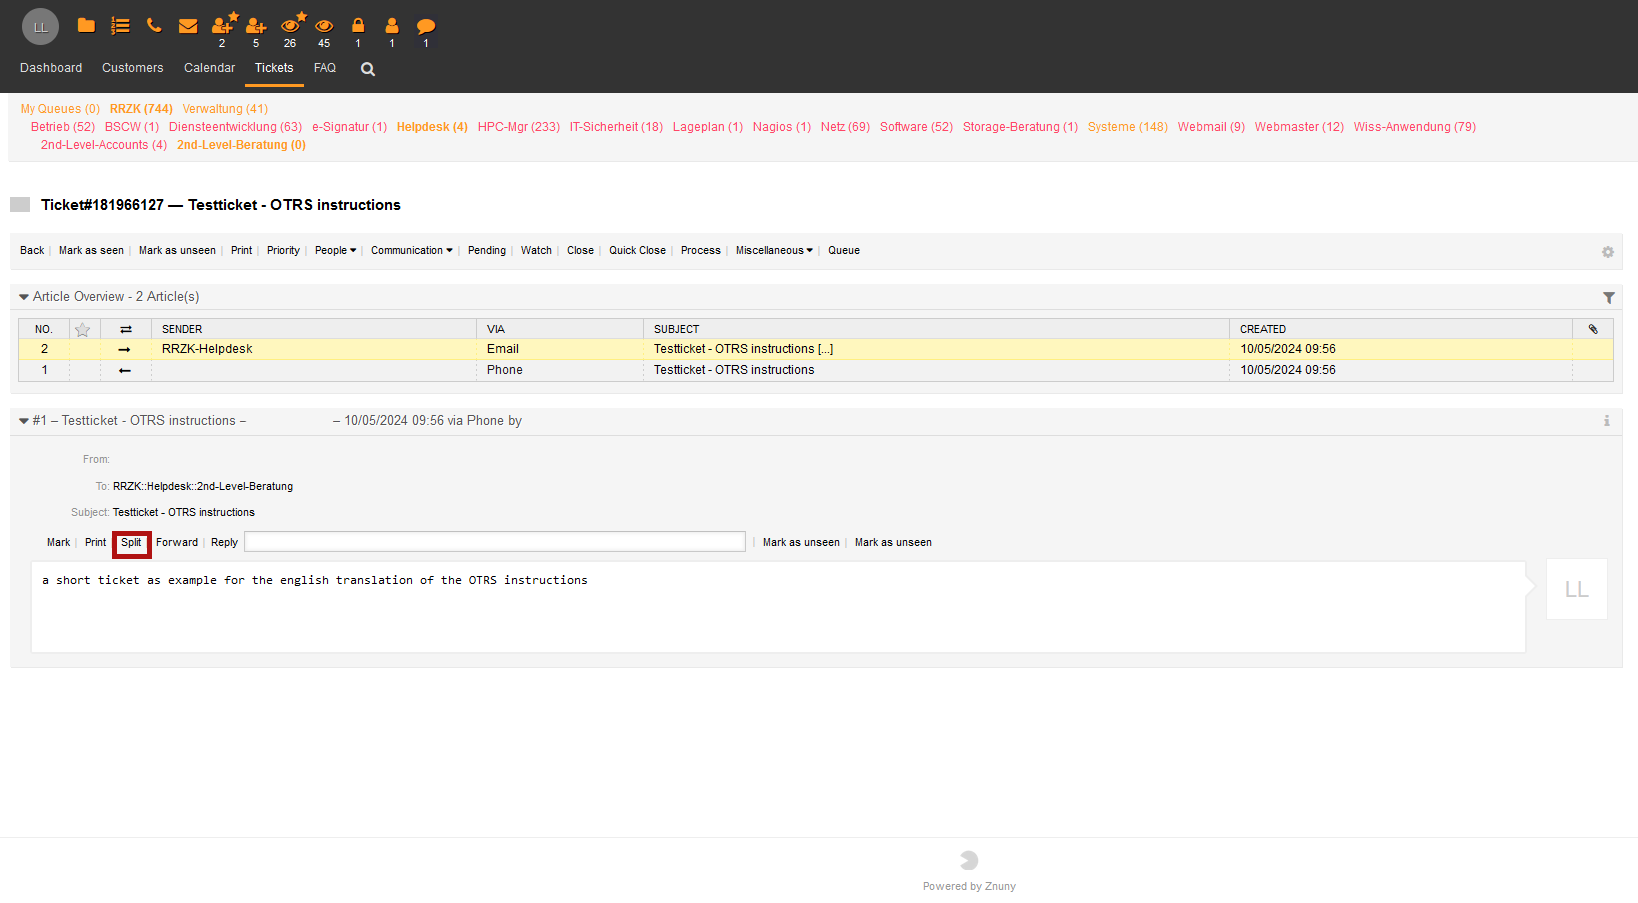
Alternatively, some tickets may contain several requests that cannot all be answered from one place. In this case, it makes sense to split the ticket using the "Split" function within the content page of the ticket. The newly created tickets can now be edited separately
.
4.7 Assigning tickets to another agent
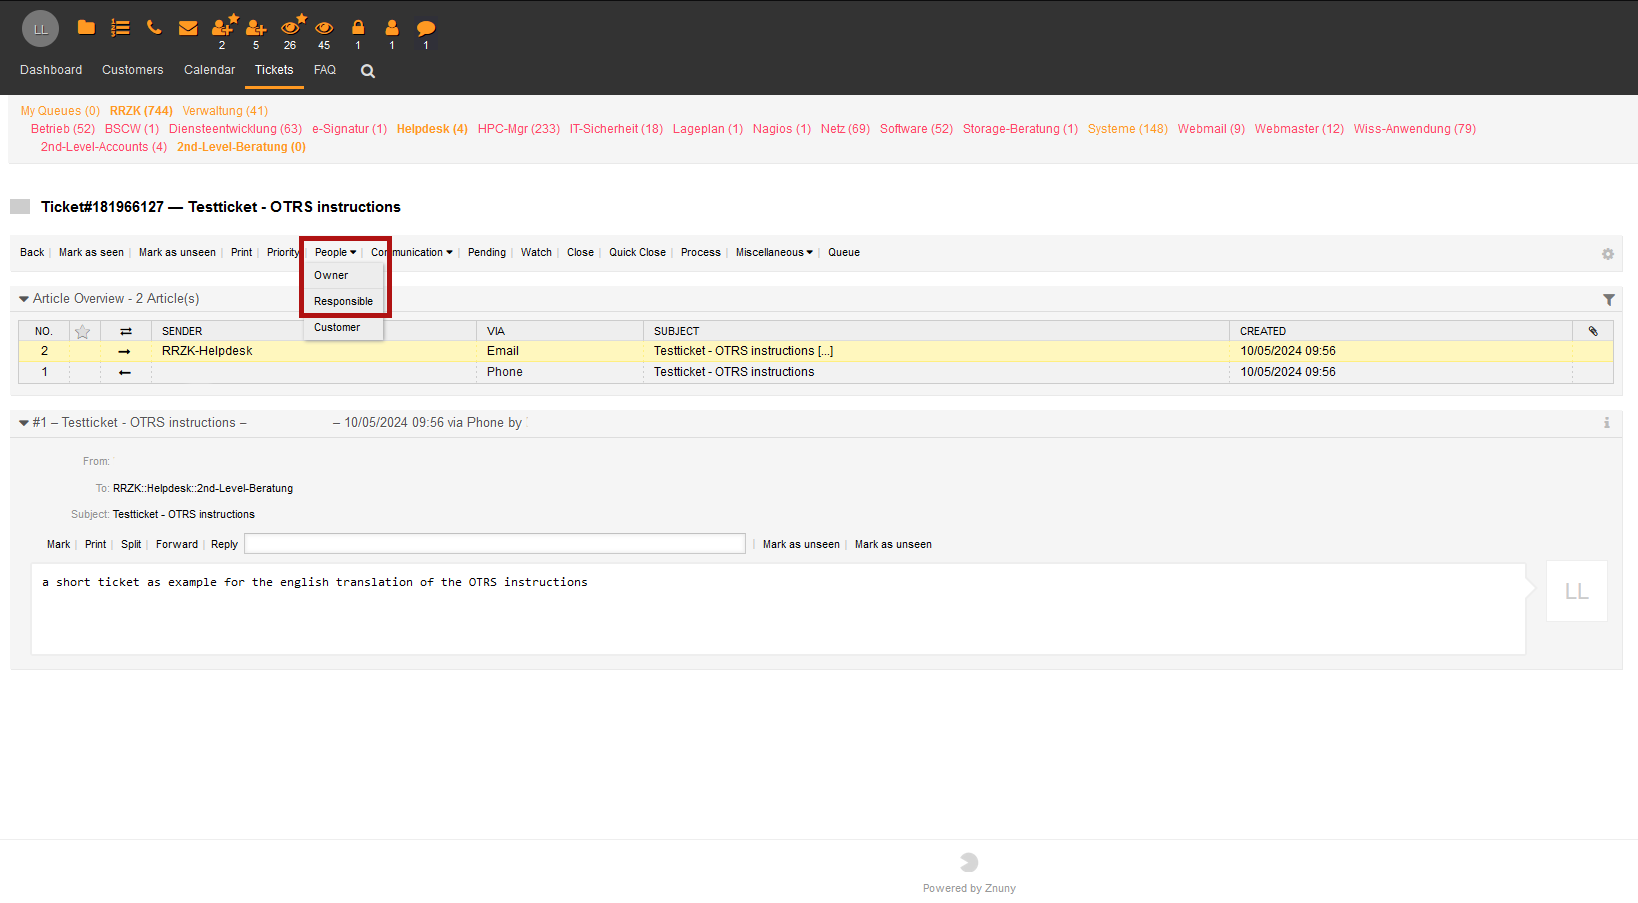
In some cases, it may also be useful to assign another owner or another person responsible for the ticket.
To do this, select the desired item in the ticket detail view under "People" in the drop-down menu and select the person concerned in the pop-up window. If required, a personalized message can be attached.
Reminder: The owner is the person who is currently editing the ticket. While ownership changes to the person processing the ticket, overall responsibility for a ticket remains with the person responsible over a longer period of time. The person responsible always has access to the ticket. This means that they can also view a corresponding ticket in other queues for which they otherwise have no authorization.
4.8 Attaching notes
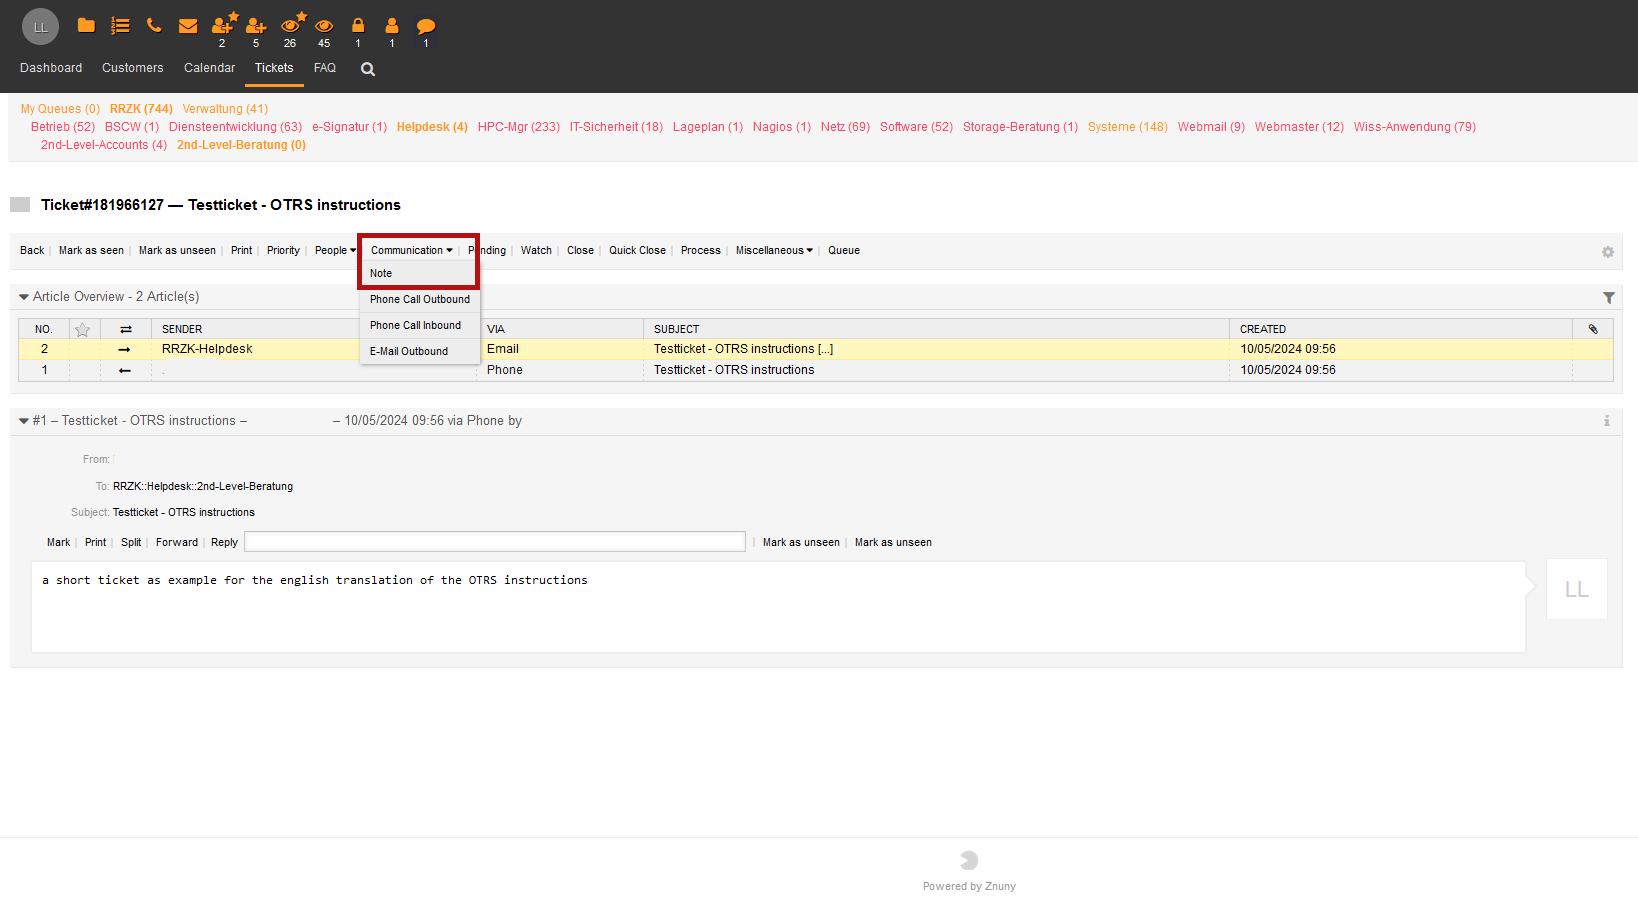
In the ticket detail view, an internal note can be attached to the ticket via the selection item "Communication" - "Note". The note is created in a pop-up window.
This is a useful function for informing other agents about the status of the ticket and providing tips for a possible solution. With the external note, the notifications can also be seen by the customer. A note about the status can also be selected as an option.
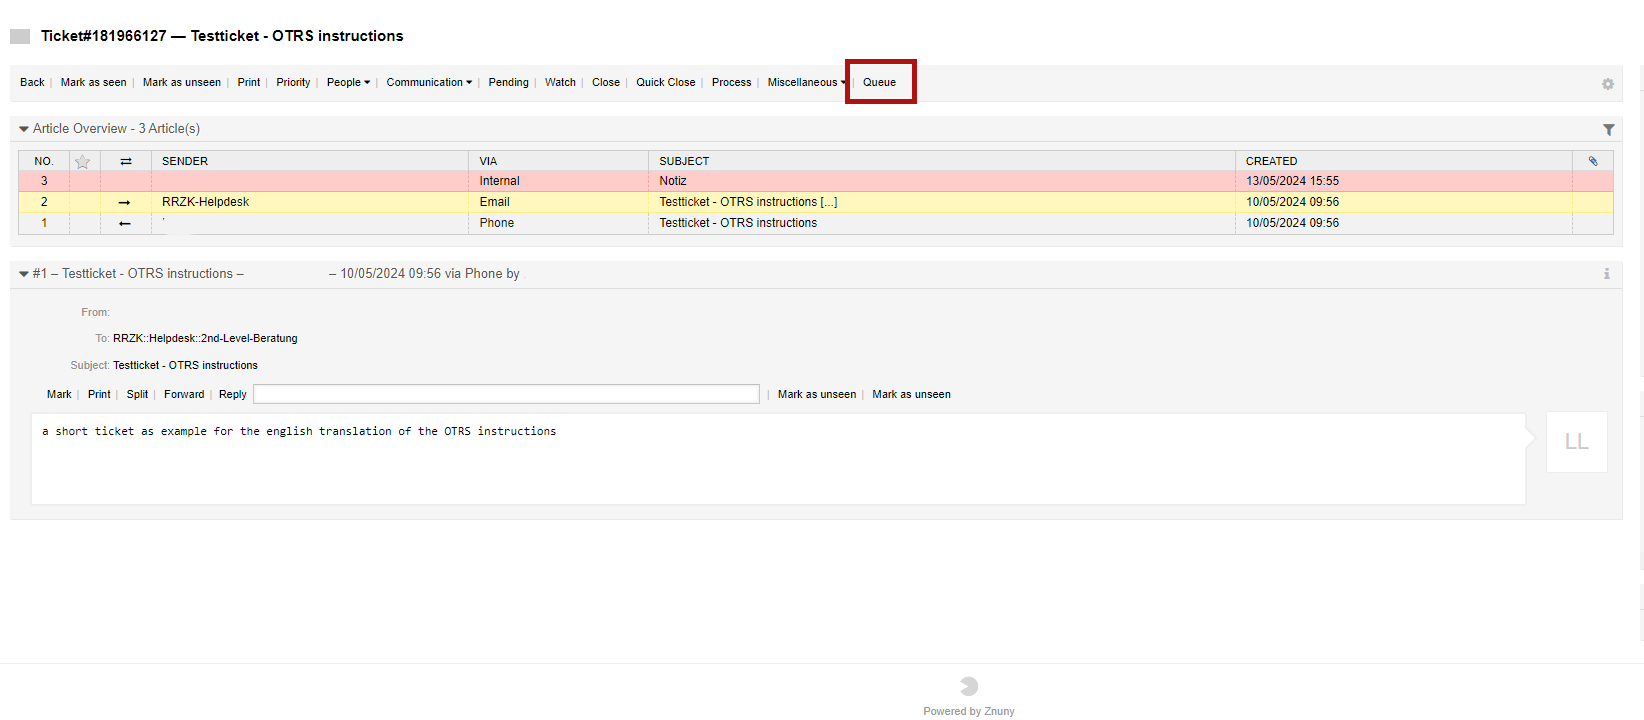
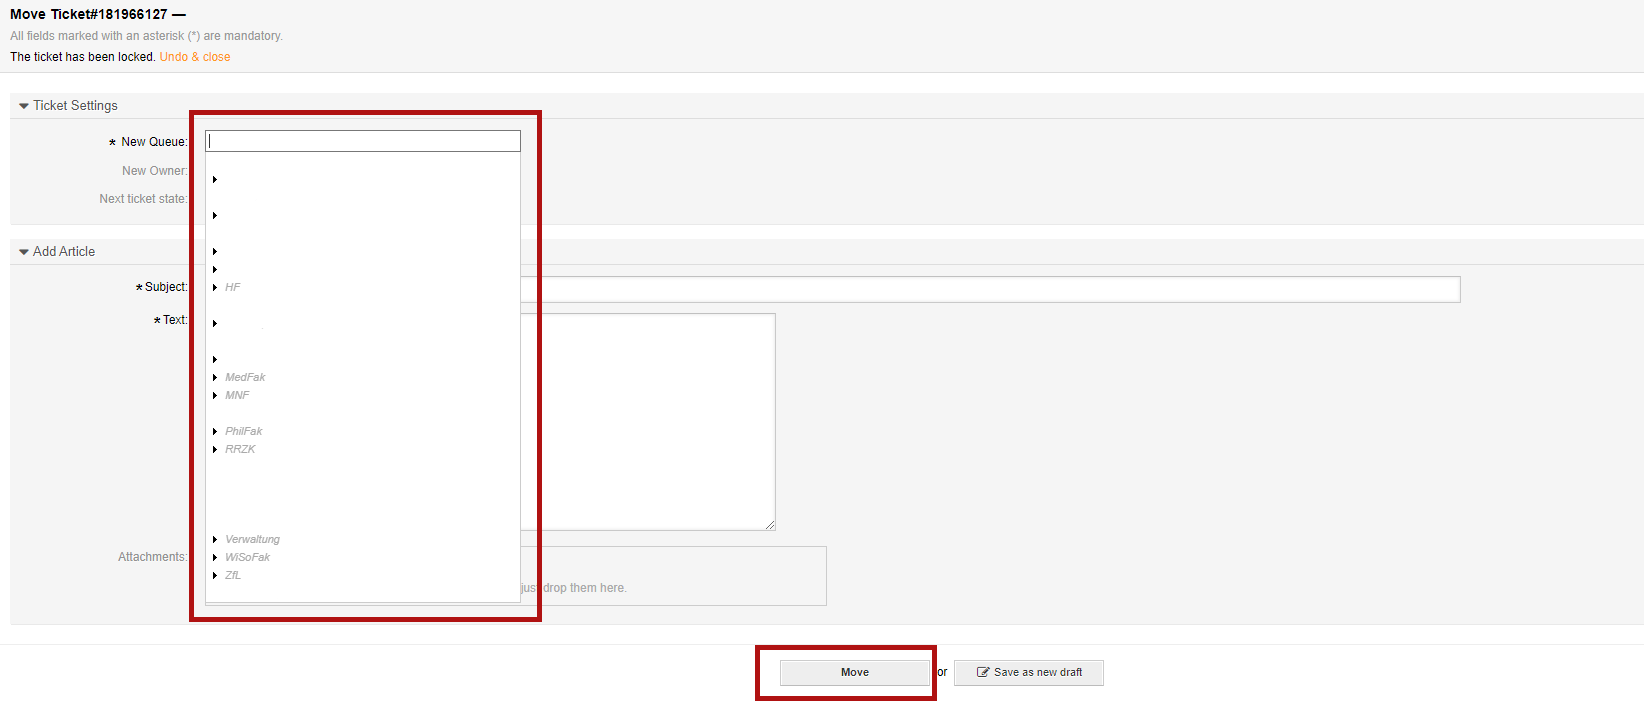
4.9 Moving tickets to another queue
If the customer request indicates that the issue falls under a different area of responsibility, it is possible to forward a ticket to a different department or organization.
Click on "Queue" in the detailed view to open a pop-up where the new queue can be selected. Under Owner, the ticket can optionally be assigned to a specific agent. The "Submit" button initiates the forwarding.

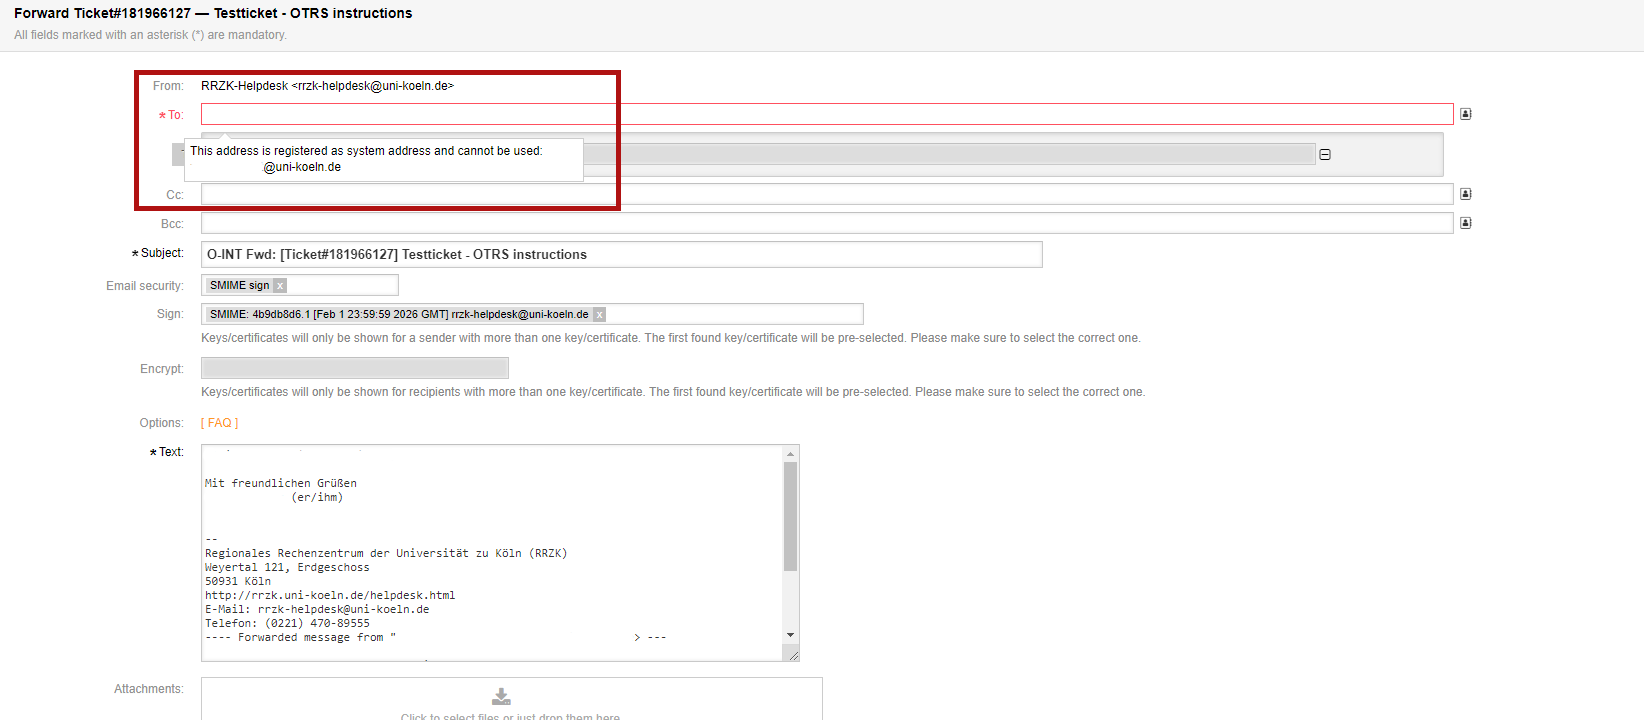
4.10. Forwarding and redirecting tickets
To forward a ticket by email to another department or organization that does not work with the OTRS of the University of Cologne, you can click on "Forward" in the detailed view of the ticket.
However, forwarding to other queues is not possible. Instead, the ticket must be moved to another queue as described. If you accidentally try to forward a ticket to an existing OTRS queue, you will receive a corresponding error message.
When forwarding a ticket, a new window opens, you can select the appropriate setup and send the forwarding by clicking on "Send mail". Important: Please make sure not to delete the abbreviation "0-INT" in the subject line to ensure that customers cannot see the query.
Create ticket by agent
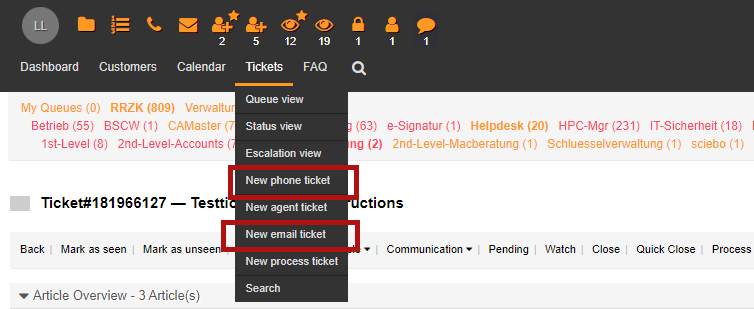
OTRS offers agents two ways to create a ticket themselves. You can create a phone and email ticket either via the corresponding icons in the toolbar at the top left or in the menu item "Tickets" under "New phone ticket" and "New email ticket".
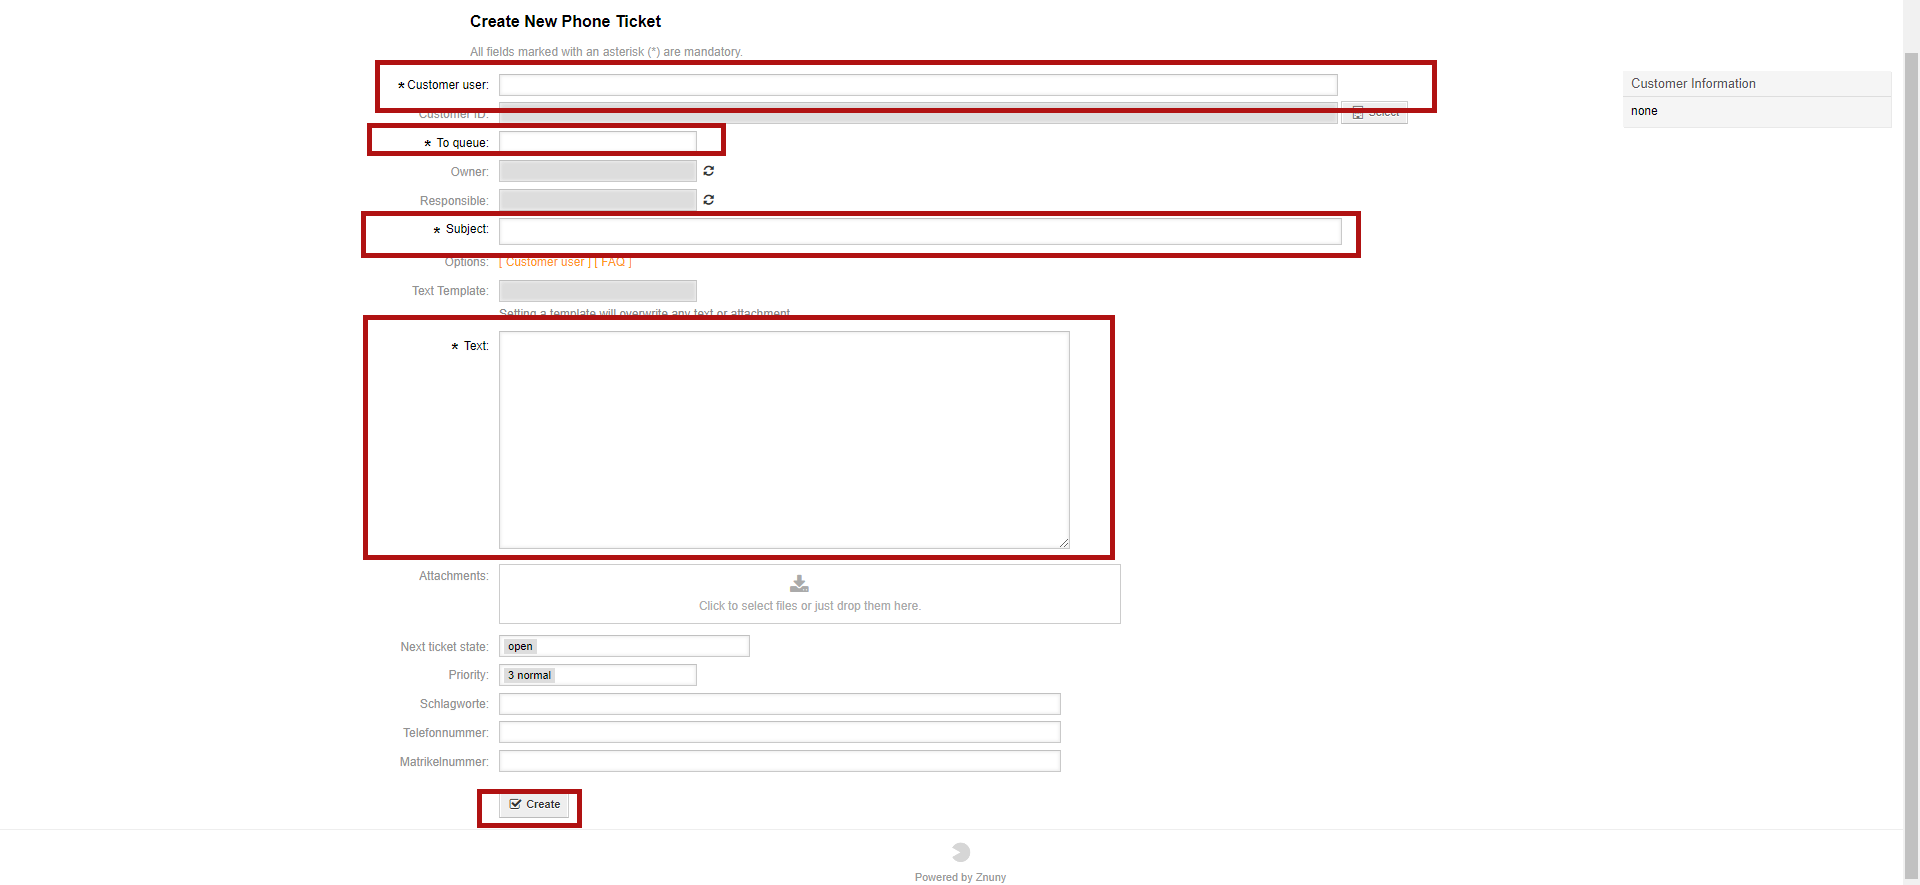
5.1 Creating a telephone ticket
A telephone ticket can be used to record a user request on the telephone and convert it into a ticket for processing.
When creating this ticket, the corresponding queue can also be assigned. Please note that the customer's e-mail address must be available and entered.
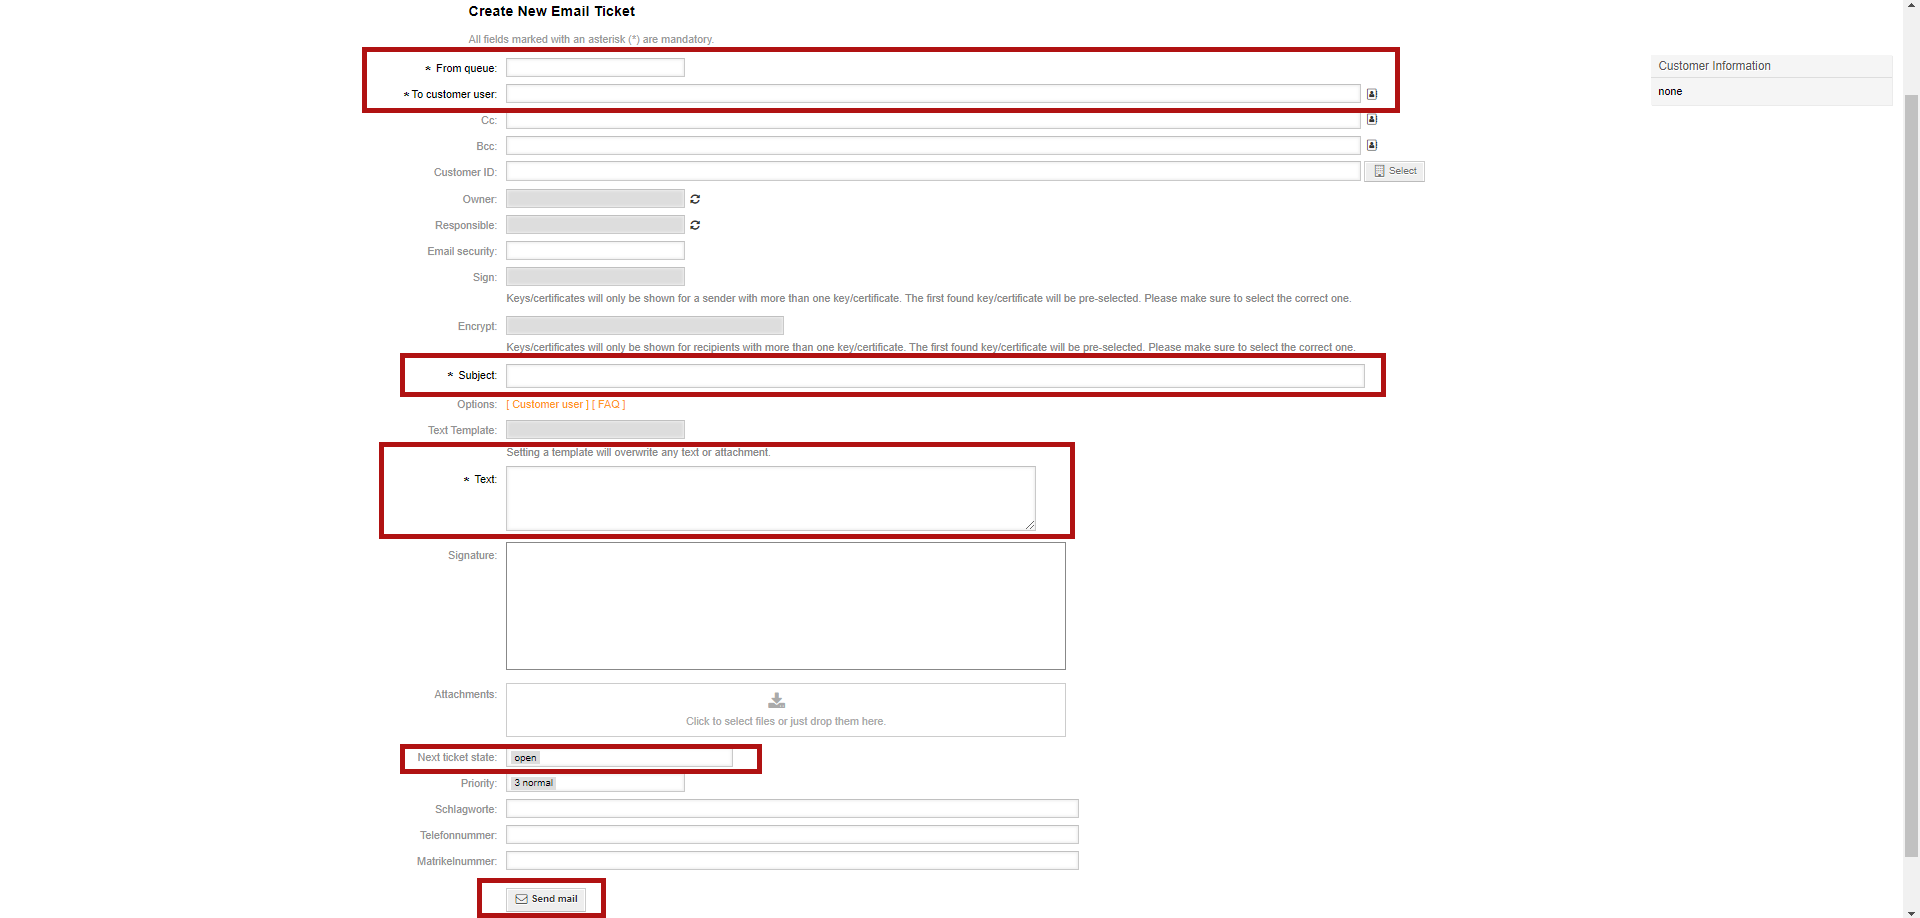
5.2 Creating an email ticket
An email ticket is created to contact users. You must specify which sender address the ticket should be sent to and therefore which queue a reply should be added to. The user's email address must also be entered. Clicking on "Create" sends an email to the user and the ticket created becomes visible in the specified queue. The procedure for creating a ticket is similar to 4.1 Creating a phone ticket.
An email ticket is not used to create tickets in external queues! Use the customer interface or write a direct e-mail to the queue for this purpose.
Ticket search
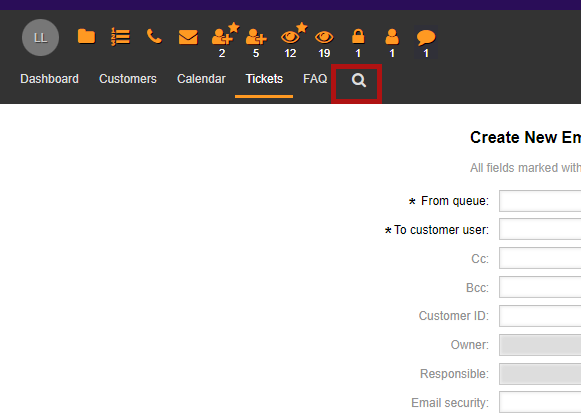
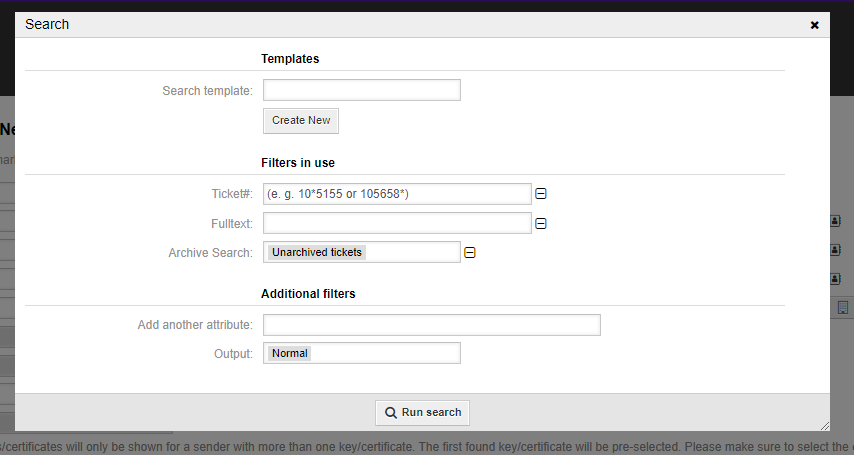
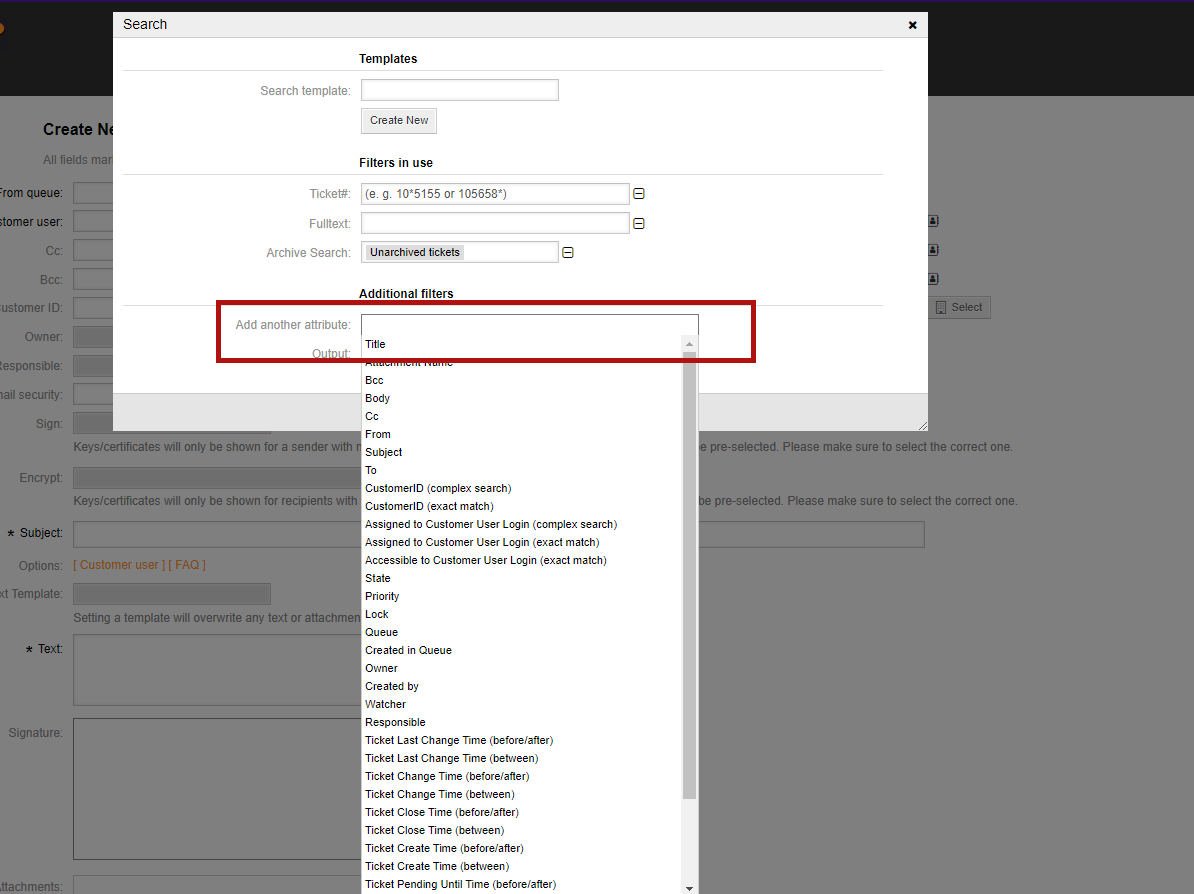
The magnifying glass icon can be used to search for specific tickets in OTRS. The search window is divided into three parts in the standard view.
- Search templates can be created and selected at the top.
- The full text search is preconfigured in the middle, which is usually sufficient for the first search.
- Additional filter attributes can be added in the lower section.
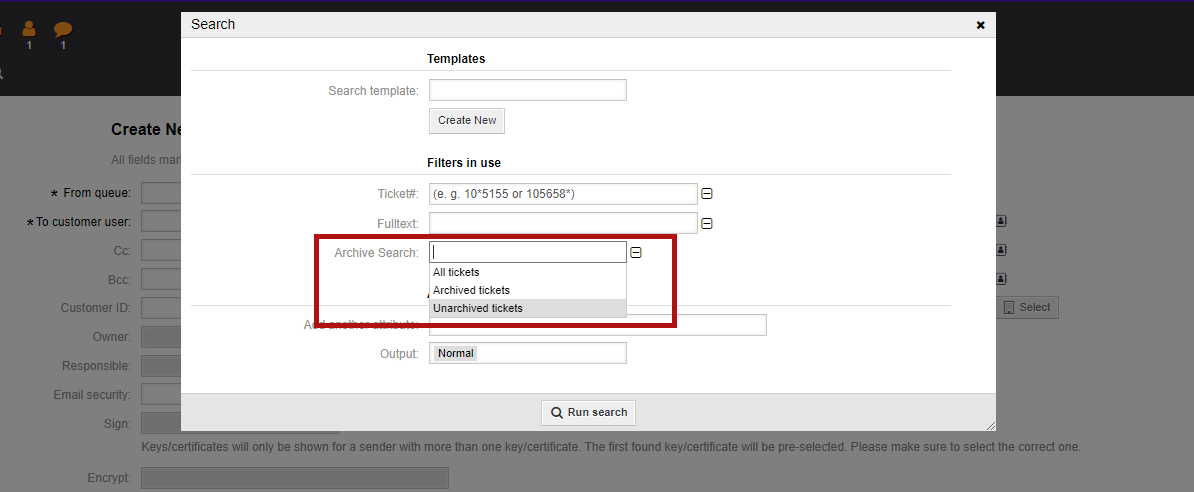
Filter attributes can be, for example, ticket number, subject or name. Filters can also be added that only take a specific time period into account. As a rule, tickets from the last 30 days are displayed in the search. However, you can also access tickets from the past two years. Note: After two years in a closed state, the tickets are removed in accordance with the agreement with the data protection officer and the staff councils. For an archive search, select an additional attribute in the search area in the additional filter settings and add the archive search by making the appropriate selection. The archive search can be combined with the normal search (see screenshots) or used separately. The search word can then be entered in the full text search and the search started.
Settings
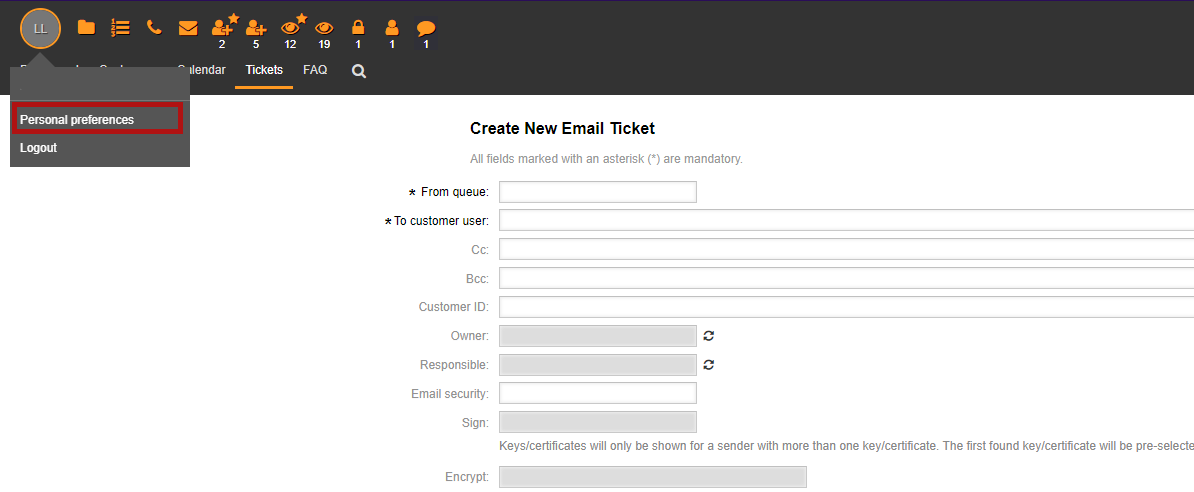
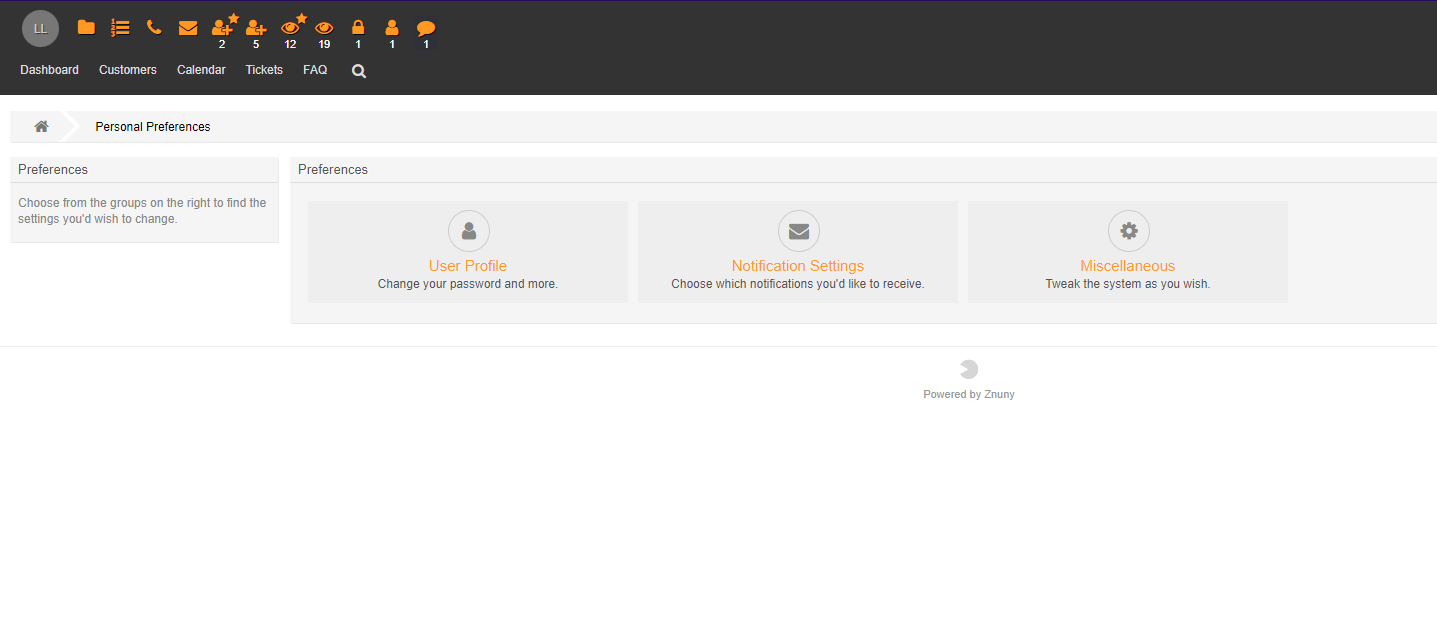
The round icon with your initials takes you to your personal settings. Under "User profile" you can set the language, time zone and absence times, for example.
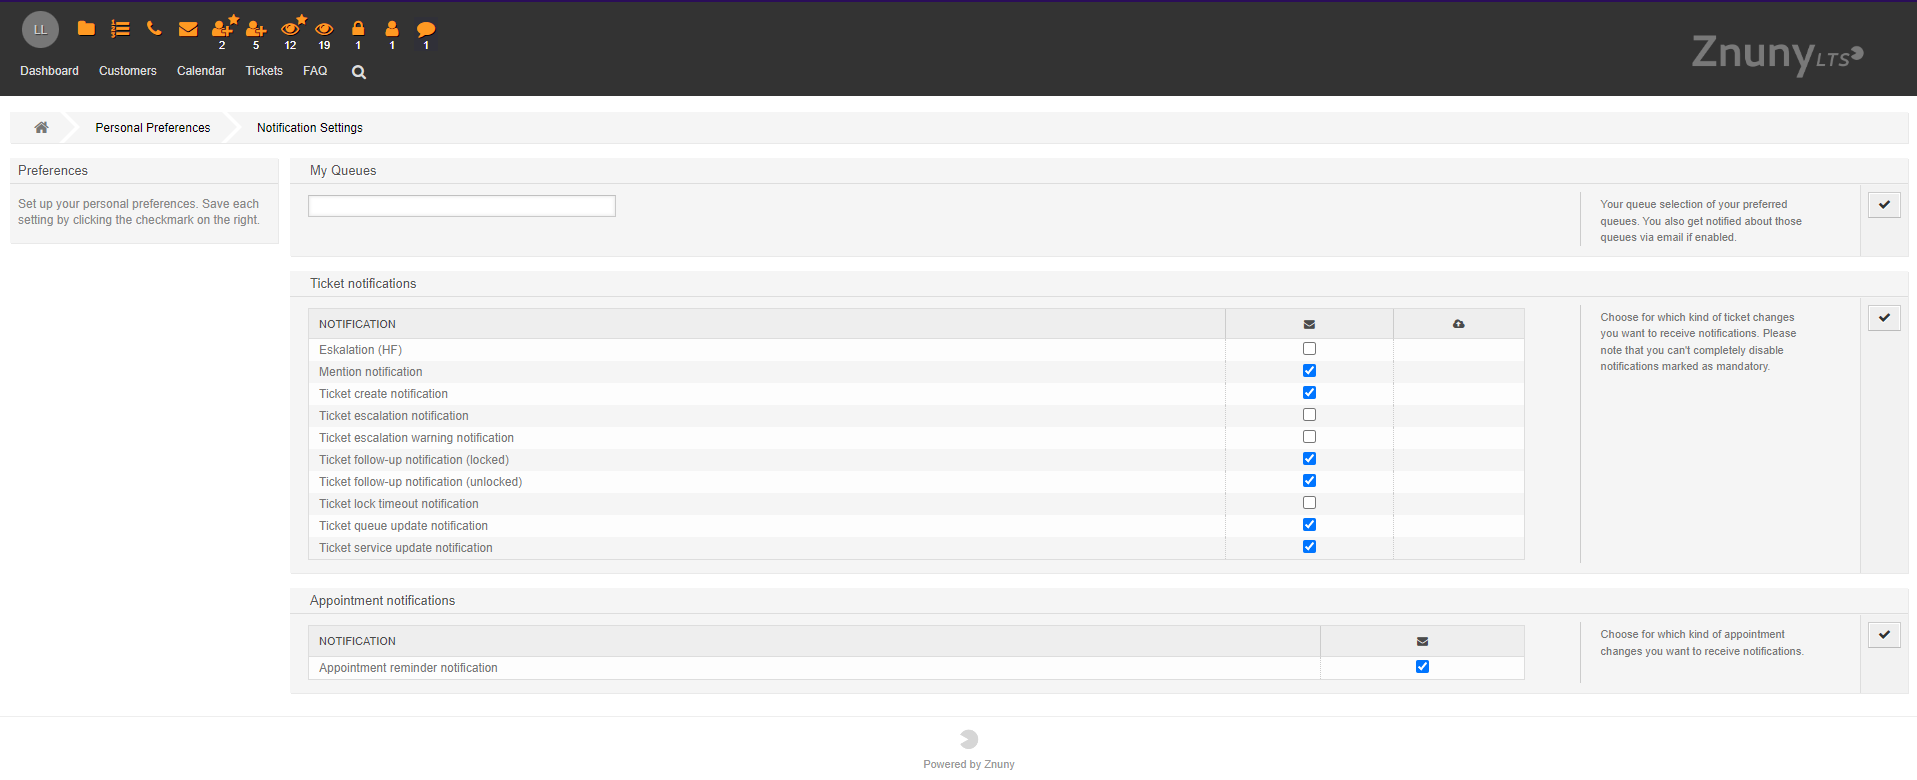
Under "Notification settings", you can select your preferred queues, which are added up in the queue view under "My queues".
Important: The ticket notifications by email that can be set here apply to the subscribed queues under "My queues". Email notifications are of course optional.
Miscellaneous
8.1 The use of tickets and emails
A ticket is always sent when it concerns a clearly defined, finalizable process. Purely informative messages should therefore be sent as e-mails and not as tickets. Our mailing lists at the RRZK are ideal for information purposes (e.g. newsletters etc.).
8.2 "Disappeared" tickets
Occasionally, customers complain that their tickets have disappeared or that the mails have not arrived.
This is often due to old emails being mistakenly clicked on "Reply" or "Forward" and then requests being sorted into existing tickets. In this case, it makes sense to ask the customer for the ticket number first. If you have any further problems, please contact the OTRS admins at: otrsadmin![]() uni-koeln.de
uni-koeln.de
Contact
If you have any questions or problems, please contact the ITCC-Helpdesk